Claude Code with Playwright: 4-agent test generation pipeline
Learn how to use Claude Code with Playwright using a 4-agent pipeline. Real token costs, app.context.md setup, Playwright MCP quick-start, and lessons from testing TestDino itself.
Best tool to track AI-generated tests


Your team ships faster than QA can write tests. Single-prompt AI generators make it worse.
They read the DOM, not your product rules, so scripts break on the next deploy. Using Claude Code with Playwright in a structured 4-agent pipeline fixes this.
We built it for TestDino itself. A 20-line prompt became 3 page objects and a full spec in 15 minutes.
Playwright MCP setup with Claude Code (quick-start)
Playwright MCP is how Claude Code gets live browser control. If you're already set up, skip ahead. If you're coming from Playwright MCP on Cursor, the server is identical.
claude                                                        # start Claude Code
claude mcp add playwright npx @playwright/mcp@latest  # add MCP server
/mcp                                                 # verify
Expected output:
playwright    ✓ connected    npx @playwright/mcp@latest
              Tools: browser_navigate, browser_click,
                     browser_snapshot, browser_take_screenshot (+18 more)
Note: Use @playwright/mcp, not the deprecated @modelcontextprotocol/server-playwright. Same API, the old one stopped getting updates.
This setup also works from VS Code and Windsurf; the server is editor-agnostic. The pipeline below uses Playwright CLI instead of MCP for token efficiency, but MCP is what you want for exploratory testing and self-QA loops.
Playwright CLI vs Playwright MCP
| Playwright MCP | Playwright CLI | |
|---|---|---|
| How it works | Streams full browser state into model context each turn | Writes artifacts to disk; model reads only what it needs |
| Token cost | High. Complex pages: 50k+ tokens per snapshot | ~4x lower. Cached context reuses between runs |
| Context risk | High on long sessions | Low |
| Best for | Exploratory debugging, self-QA, one-off flows | Repeated test generation, large projects, CI |
For the 4-agent pipeline, use CLI. The agents already get product context from app.context.md and JSDoc, so they don't need a full accessibility snapshot every turn.

Pro Tip: Don't mix interfaces in one pipeline run. MCP for exploration + CLI for automation in the same session breaks caching and inflates context unpredictably.
Built-in Playwright agents vs. the 4-agent pipeline
Playwright ships 3 built-in agents (Planner, Generator, Healer) that work with Claude Code and Cursor out of the box. Good for simple flows. Here's where the custom pipeline adds real value:
| Capability | Built-in Playwright agents | 4-agent pipeline |
|---|---|---|
| Business logic awareness | Reads accessibility tree only | app.context.md + JSDoc: routes, permissions, edge cases |
| Test case review before code | None | Human checkpoint before Automation Agent runs |
| Multi-role tests | Manual re-recording per role | storageState per user, built in |
| Maintenance on failures | Healer auto-applies fixes (masks bugs) | Maintenance Agent proposes a diff; you approve |
The Healer auto-applying fixes is the gap that matters most. If a test broke because the feature's permission rule changed, a silent fix hides a real bug.
The 4-agent pipeline
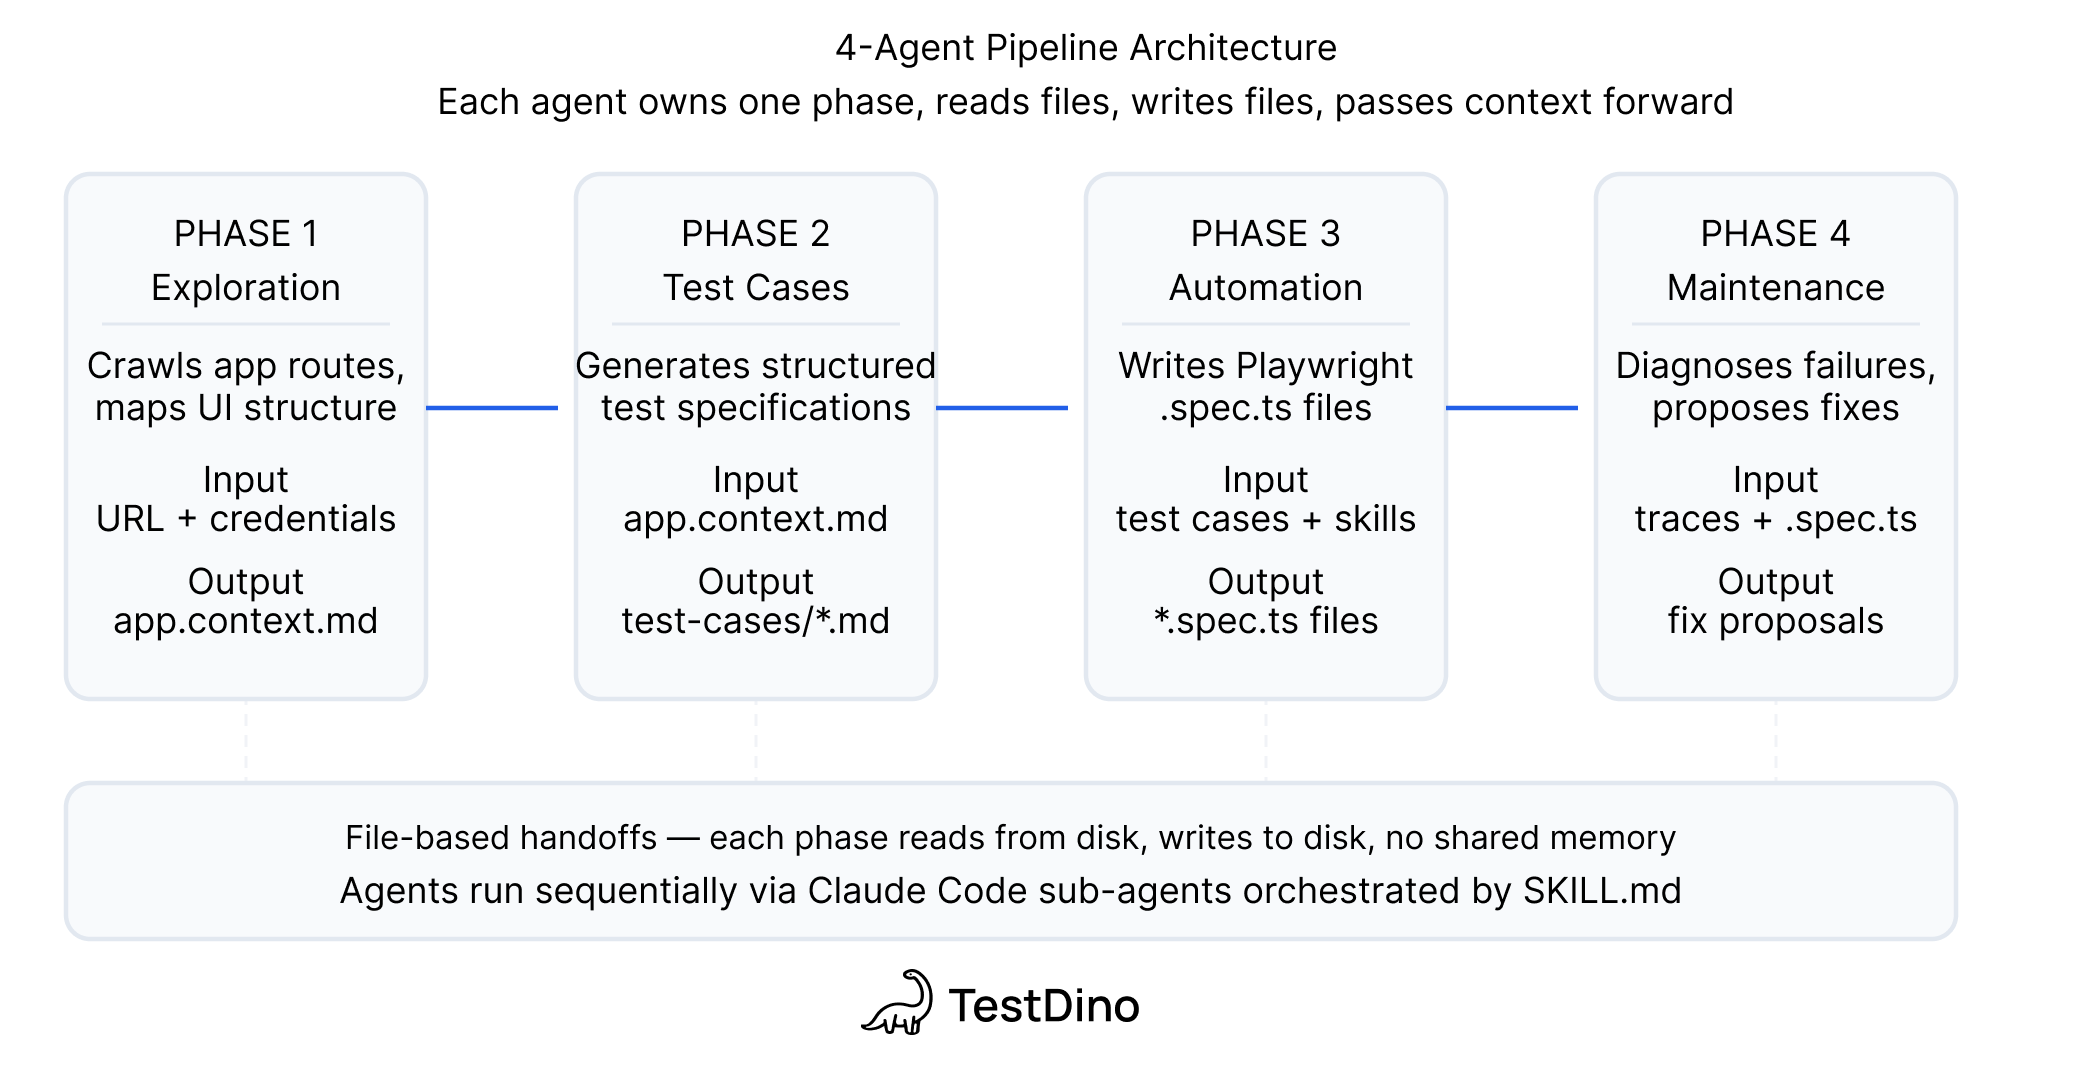
Every handoff is a file on disk. No orchestrator. You can stop between any 2 phases, edit the output, and resume the next day.
| Agent | Input | Output |
|---|---|---|
| Exploration | Docs + live app via Playwright CLI | app.context.md + per-feature JSDoc |
| Test Case Generation | app.context.md + JSDoc | Test case files with steps, preconditions, expected results |
| Automation | Test cases + live app + Playwright Skills | Page objects + .spec.ts files + results |
| Maintenance | Failing tests + page objects + TestDino MCP | Fix proposals or bug reports |
Note: The intelligence is not in the model. It's in what you feed the model. Without app.context.md, JSDoc, and Skills, you get generic scripts.
The 3-layer context strategy
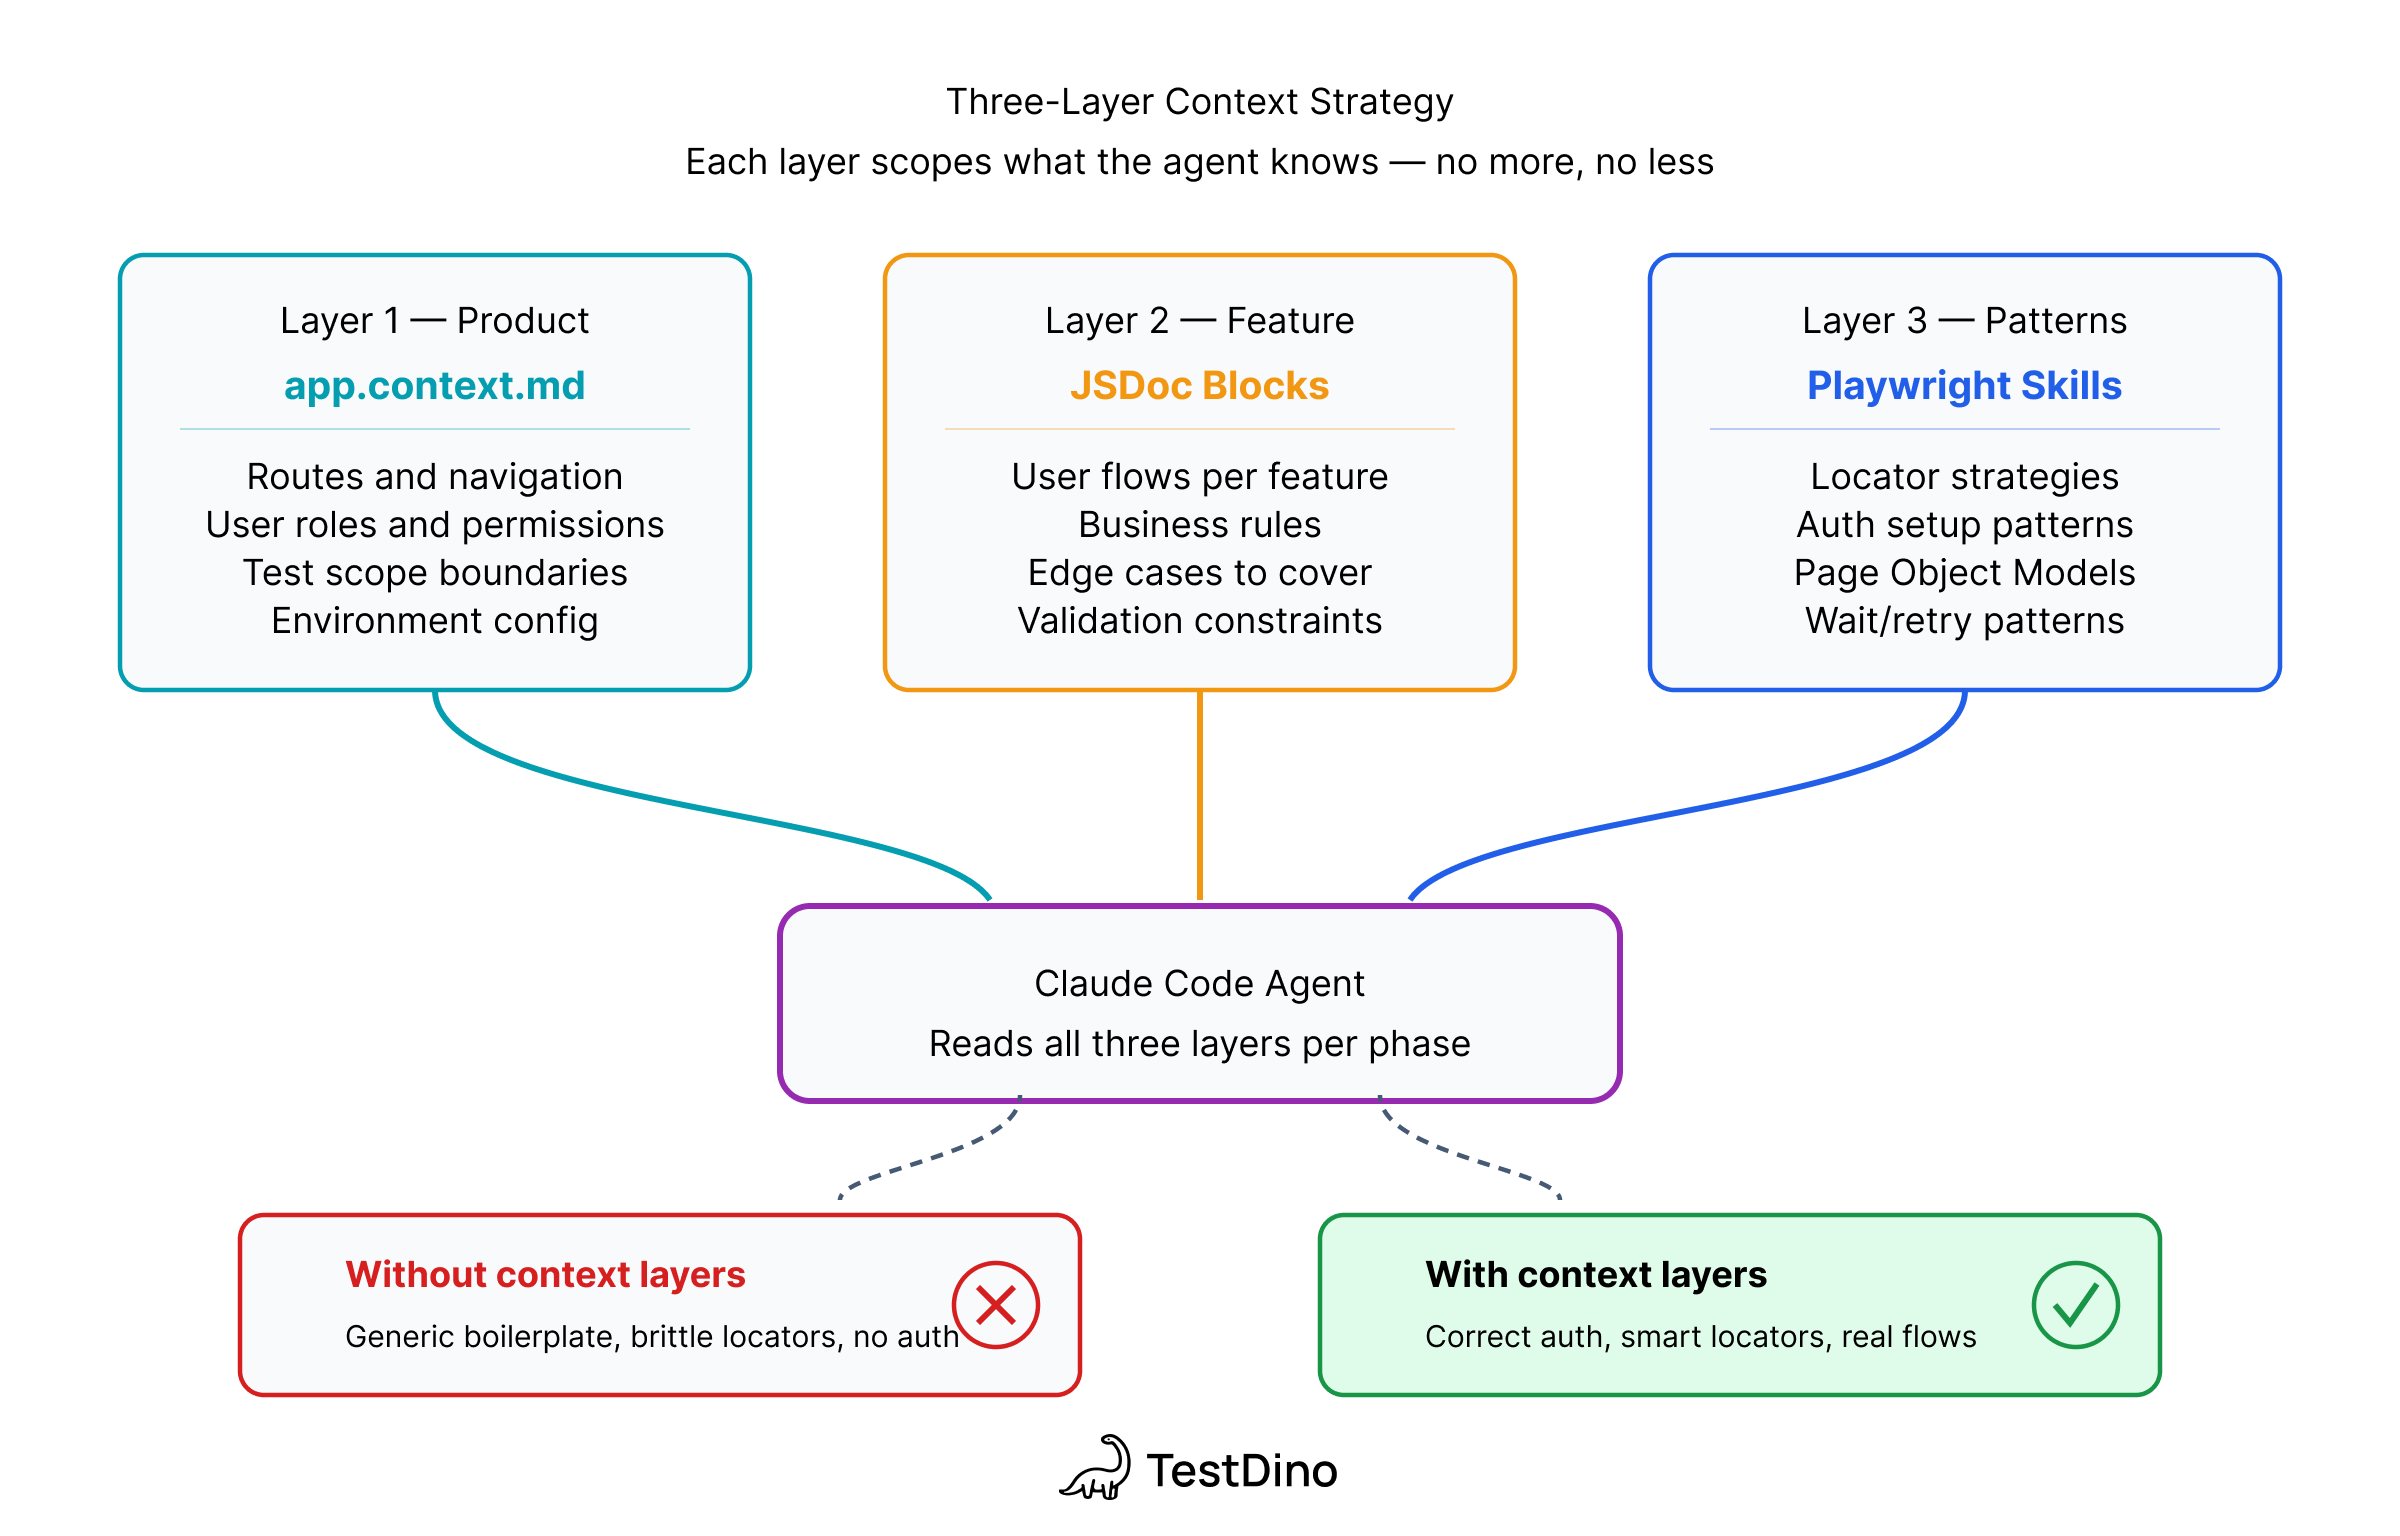
Layer 1: app.context.md - product knowledge before the agent touches a selector.
# tests/app.context.md
## What this app does
TestDino is a Playwright test reporting platform.
- Core workflows: upload runs, view failure groups, triage flaky tests, manage API tokens
- User roles: Owner, Admin, Member, Viewer
- Auth: email/password at /auth/login
- NOT in scope: billing/Stripe, Google OAuth
Layer 2: Per-feature JSDoc: what the accessibility tree won't reveal: clipboard-only tokens, permission rules, conditional flows.
/**
 * @feature API Keys Management
 * @route /org_.../projects/.../settings?tab=api
 * @rules
 *   - Only Owner and Admin can create/rotate/delete
 *   - Token prefix: trx_
 *   - Create: token visible in response dialog
 *   - Rotate: token clipboard-only, NOT shown in UI — use API interception
 */
export class ApiKeysPage { ... }
Pro Tip: Only document what the accessibility tree can't reveal. If the agent can find it by exploring the UI, don't put it in JSDoc. Start minimal and add only where the agent loops.
Layer 3: Playwright Skills: curated markdown guides that enforce production patterns: getByRole over CSS selectors, storageState for auth, auto-waiting assertions, Page Object Model structure.
# Install the Playwright Skill into your project
npx skills add testdino-hq/playwright-skill
Without Skills, Claude generates valid Playwright code. With Skills, it generates code that matches what your team would write by hand. The Playwright Skill guide covers the full 70+ guide structure.
Real example: API key workflow (20-line prompt to working spec)
This is the hardest part: a workflow that crosses browser and CLI boundaries, involves conditional logic, and has 2 different token-capture strategies depending on the path.
The Automation Agent prompt:
Write a Playwright test suite using Page Object Model.
App: https://app.cms.testdino.com — login via env vars.
Tests run serially. Token from test 2 must be available to test 3.

Test 1: Happy path login
Test 2: Create or rotate API key named "e2e-test"
- If "e2e-test" doesn't exist: create it, capture token
- If it exists: rotate it, capture new token
- Token only shown once after create/rotate
Test 3: Upload report via CLI and verify counts in UI
  npx tdpw upload ./playwright-report --token=<TOKEN>
  --environment="staging" --tag="e2e-pipeline" --json
The tricky part: rotation sends the token directly to the clipboard. It's never rendered in the DOM. The agent needs API response interception, and the promise must be registered before the click, not after. If you click first, the response arrives before the listener exists. That's 1-in-10 flakiness in CI.
// tests/pages/api-keys.page.ts
async rotateKey(name: string): Promise<string> {
  const row = this.page.getByRole('row', { name });
  await row.getByRole('button', { name: 'Rotate' }).click();
  await expect(this.rotateDialog).toBeVisible();

  // Promise-first: register BEFORE confirming rotation
  const responsePromise = this.page.waitForResponse(
    (resp) => resp.url().includes('/api-key') && resp.request().method() === 'PUT',
  );
  await this.confirmRotateButton.click();

  const response = await responsePromise;
  const body = await response.json();
  return body.data.token; // trx_... prefix
}
Both create and rotate use this interception pattern, more reliable than parsing dialog text that could change with any UI update.
Expected output:
Running 2 tests using 1 worker

  ✓  [chromium] › api-keys.spec.ts › create or rotate key (4.3s)
  ✓  [chromium] › api-keys.spec.ts › upload report and verify (9.1s)

  2 passed (13.4s)
Where agents actually get stuck
These are real loops from our runs, not hypotheticals:
| Stuck point | Root cause | Fix |
|---|---|---|
| Rotation token not in UI | Clipboard-only, never rendered | "Intercept the PUT /api-key response instead" |
| Over-reading files | Agent reads full files not sections | Restructured page objects to be smaller, no prompt fix |
| Create vs rotate confusion | Ambiguous conditional | "Check whether the key name exists in the table first" |
| Wrong CLI flags | Non-standard tdpw syntax | Pasted the exact upload command with all flags |
| Token lost across serial tests | Missing test.describe.serial() | "Write the token to a variable at describe scope" |
Standard patterns (login, form fill, navigation) worked first try. The loops happened exclusively where the answer wasn't in the DOM or codebase but in someone's head. That's what JSDoc is for.
Token costs from real runs
API key workflow session: 110k of the 200k context window (55%) at one mid-session snapshot.
Single file read: 137.9k tokens in 1 tool call. One large unfocused page object. Keep them small.
The costliest loop: 3 attempts on the clipboard token before 1 sentence of guidance resolved it. The caching of app.context.md and JSDoc means subsequent feature runs cost significantly less because the Exploration phase doesn't need to repeat.
Expert insight: The RBAC test on a 207-file refactor was a lesson. About 40% needed significant rework because the agent guessed at permission rules instead of reading every changed file. Write tests alongside development when the diff is still small. Large refactors overwhelm context reasoning.
CLAUDE.md for the pipeline
CLAUDE.md tells Claude Code its role, where context lives, and what it must never do autonomously.
# CLAUDE.md
## Read first
tests/app.context.md — read at session start, once.

## Playwright patterns
Load the Playwright Skill before writing any test code.
Install: npx skills add testdino-hq/playwright-skill

## Hard rules
- Never auto-apply test fixes. Show a diff first, wait for approval.
- Never modify a page object without reading its JSDoc block first.
- Locators: getByRole or getByTestId. No CSS selectors.
- Auth: storageState from tests/auth/ only. Never hardcode credentials.
- Staging only. Never run against production.
One CLAUDE.md covers every agent, every session, every team member. It eliminates the "Claude forgot the rules" problem on long runs. See the Playwright best practices guide for how this fits into a full project setup.
Multi-user auth with storageState
RBAC tests need sessions for each role. Set them up once in the Exploration phase; every downstream agent reuses them.
// tests/auth/global-setup.ts
const roles = [
  { name: 'owner', email: process.env.OWNER_EMAIL!, password: process.env.OWNER_PASS! },
  { name: 'admin', email: process.env.ADMIN_EMAIL!, password: process.env.ADMIN_PASS! },
  { name: 'member', email: process.env.MEMBER_EMAIL!, password: process.env.MEMBER_PASS! },
  { name: 'viewer', email: process.env.VIEWER_EMAIL!, password: process.env.VIEWER_PASS! },
];

for (const role of roles) {
  const context = await browser.newContext();
  const page = await context.newPage();
  await page.goto(`${process.env.BASE_URL}/auth/login`);
  await page.getByLabel('Email').fill(role.email);
  await page.getByLabel('Password').fill(role.password);
  await page.getByRole('button', { name: 'Sign in' }).click();
  await page.waitForURL('**/dashboard');
  await context.storageState({ path: `tests/auth/${role.name}.json` });
  await context.close();
}
Use role-scoped storage per spec:
test.use({ storageState: 'tests/auth/member.json' });

test('member cannot create API keys', async ({ page }) => {
  await page.goto('/settings?tab=api');
  await expect(page.getByRole('button', { name: 'Generate Key' })).not.toBeVisible();
});
See the E2E testing setup guide for the full playwright.config.ts structure for multi-environment runs.
Install the open-source Playwright Skill on GitHub
5 mistakes that will hurt you
1. Skipping app.context.md. The agent explores the DOM and generates generic scripts. 30 minutes of documentation prevents 10 loops per feature.
2. Trusting the Healer on permission-sensitive tests. Auto-applied fixes on RBAC tests silently change your permission coverage without flagging it. Use the Maintenance Agent with human review.
3. Running the full pipeline on a large refactor. At 50+ changed files, the agent guesses at scope instead of reading. Keep diffs small, run the pipeline incrementally.
4. MCP for the Automation Agent. 3-4x higher token cost over CLI for the same output. MCP is for exploration, not code generation at scale.
5. Missing test.describe.serial() on data-dependent tests. Parallel execution silently breaks tests that share state between steps. Check the Playwright cheatsheet for the serial test pattern.
Common mistake: Using page.waitForSelector() over expect(locator).toBeVisible(). The old API bypasses Playwright's auto-waiting and forces you to manage timing manually. See the locators guide for the full breakdown.
Tracking AI-generated tests in CI
TestDino tracks failure patterns across runs. Tag AI-generated tests so you can compare their flakiness rates against hand-written ones:
npx tdpw upload ./playwright-report \
  --token=$TESTDINO_TOKEN \
  --environment="staging" \
  --tag="ai-generated,claude-code" \
  --json
When tests break, the Maintenance Agent queries error grouping and trace viewer data across CI runs, not just 1 failing trace in isolation. That history changes the fix proposal: a test failing 3 of 5 runs gets a retry strategy; a test failing after every deployment gets a bug report.

Conclusion
The 4 things worth remembering: app.context.md quality determines output quality more than prompt length.
The human checkpoint between Test Case Agent and Automation Agent catches most coverage mistakes before they cost tokens.
Large refactors break the pipeline, keep diffs small. And the Maintenance Agent needs CI history, not just a local trace, to diagnose correctly.
Full Playwright AI ecosystem overview if you want to see where this fits. For a fresh project, start with the Playwright Skill: the fastest path to Claude Code writing production-quality tests from session one.
FAQ
Both use the same MCP server. Cursor with Playwright gives inline editor suggestions. Claude Code gives a terminal agent that reads your full project, runs tests, and iterates on failure output. For structured test generation with app.context.md + JSDoc, Claude Code produces more consistent results; for quick in-file fixes, Cursor is faster.
Yes. The app.context.md, JSDoc, and Skills architecture is editor-agnostic. Swap the Claude Code MCP config for Cursor's and the pipeline is identical.
Table of content
Flaky tests killing your velocity?
TestDino auto-detects flakiness, categorizes root causes, tracks patterns over time.
Follow Us