Python Playwright Tutorial: End-to-End Testing with Pytest (Step-by-Step)
This Python Playwright tutorial walks you through setting up pytest, writing end-to-end tests, handling selectors, assertions, and running automated browser tests with real code examples.


This Python Playwright tutorial shows you how to set up a testing project from scratch, write browser tests using pytest, and run them across Chromium, Firefox, and WebKit. Playwright gives Python developers a single library that opens browsers, clicks through pages, fills out forms, and checks that everything works the way real users expect.
The harder part is not picking the tool. It is wiring Playwright into an existing Python and pytest workflow without fighting boilerplate. Setting up fixtures, choosing stable locators, and keeping tests reliable across browsers takes more effort than most "getting started" guides admit.
This guide walks through every step from installation to running end-to-end tests in CI. By the end, you will have a working project structure, real test files, and the knowledge to scale your suite with confidence.
What is Playwright for Python and why use it
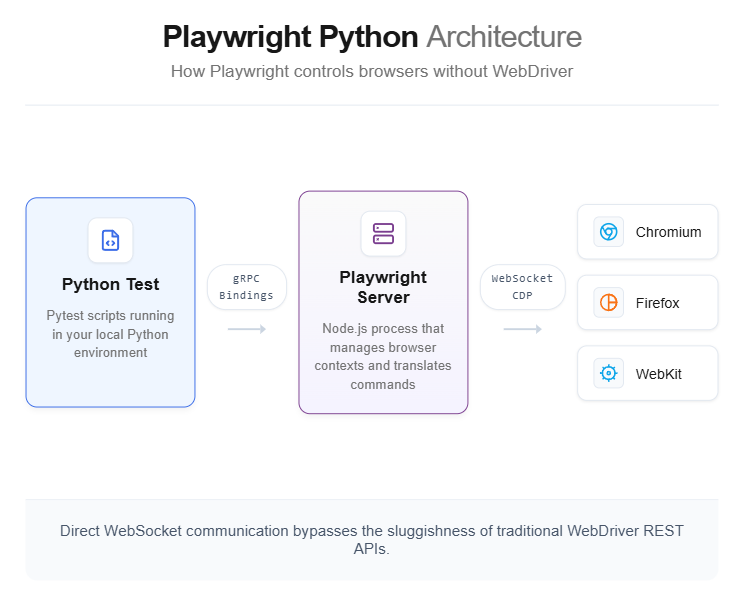
Playwright is an open-source browser automation framework built by Microsoft that lets you control Chromium, Firefox, and WebKit from Python. It handles element waiting, test isolation, and browser lifecycle automatically, so you spend time writing test logic instead of debugging timing issues.
Microsoft released the Python binding for Playwright alongside the original Node.js version. The Python package lives on PyPI under the name playwright, and the recommended testing plugin is pytest-playwright. Together, they give you everything needed for browser testing without installing a separate WebDriver. The official Playwright for Python documentation covers every API in detail and stays current with each release.
How Playwright Python compares to Selenium
Teams moving from Selenium often ask what actually changes day to day. The table below highlights the key differences.
| Feature | Playwright Python | Selenium Python |
|---|---|---|
| Browser engines | Chromium, Firefox, WebKit | Chrome, Firefox, Edge, Safari (via drivers) |
| Auto-waiting | Built-in for every action | Requires explicit waits |
| Parallel execution | Via pytest-xdist workers | Via Selenium Grid or pytest-xdist |
| Test isolation | New browser context per test | Manual session management |
| Codegen | Built-in recorder generates Python | Selenium IDE (separate tool) |
| Network interception | Native route API | Requires proxy or CDP |
| Installation | pip install + playwright install | pip install + download drivers |
The Playwright vs Selenium debate comes down to project needs. Playwright handles waiting and context isolation out of the box, which cuts down on the flaky test issues Selenium projects usually fight later. But Selenium still covers more browser and language combinations.
Why pair Playwright with pytest
Playwright ships a dedicated pytest plugin called pytest-playwright. This plugin provides ready-made fixtures like page, context, and browser that spin up and tear down automatically before each test function.
The plugin handles four things that you would otherwise write manually:
- Browser lifecycle: launches and closes browsers once per session
- Context isolation: creates a fresh browser context per test, so cookies and storage never leak between tests
- CLI flags: adds --headed, --browser, --slowmo, --tracing, and other options directly to the pytest command
- Parallel-ready: works with pytest-xdist for parallel execution across multiple workers
You do not need to write with sync_playwright() as p: boilerplate in every test file. The plugin does it for you.
Prerequisites and environment setup
Before writing any test, you need three things on your machine:
- Python 3.8 or higher (Playwright's minimum requirement)
- pip (comes with modern Python installs)
- A code editor (VS Code works well with the Python and Playwright extensions)
Checking your Python version
Open a terminal and run:
python --version
If you see Python 3.8 or above, you are good to go. On macOS or Linux, you may need to use python3 instead of python.
Creating a virtual environment

Tip: Always use a virtual environment for Playwright projects. It keeps your browser binaries and dependencies isolated from other Python projects on the same machine.
Create and activate a virtual environment:
python -m venv pw-env
Activate it based on your operating system:
pw-env\Scripts\activate

terminal - macOS/Linux
source pw-env/bin/activate
Once activated, your terminal prompt will show (pw-env) at the beginning. Every package you install from this point goes into this environment only.
Recommended project folder structure
Set up a clean folder structure before you start coding. This structure scales well as your test count grows.
playwright-python-project/
├── tests/
│ ├── init.py
│ ├── conftest.py
│ └── test_example.py
├── pages/
│ ├── init.py
│ └── login_page.py
├── pytest.ini
└── requirements.txt
- tests/ holds all test files following the test_ prefix naming convention
- pages/ stores page object classes (covered later in this tutorial)
- conftest.py contains shared pytest fixtures and configuration
- pytest.ini sets default CLI arguments

Installing playwright-pytest and browser binaries
The installation takes two commands. The first pulls in the pytest plugin along with the core Playwright library. The second downloads the actual browser binaries that Playwright controls.
Step 1: install the pytest plugin
pip install pytest-playwright
This single command installs three packages:
- playwright (the core automation library, version 1.49+ at the time of writing)
- pytest-playwright (the plugin that adds fixtures and CLI flags)
- pytest (if not already installed)
Step 2: install browser binaries
playwright install
This downloads Chromium, Firefox, and WebKit browsers into a local cache. The total download size is around 400 to 500 MB depending on your OS.
Note: If you only need one browser, use playwright install chromium to save bandwidth. You can always install the others later.
Step 3: verify the installation
Run a quick check to confirm everything is wired up:
python -c "from playwright.sync_api import sync_playwright; print('Playwright installed successfully')"
If no errors appear, you are ready to write tests.
Troubleshooting common install failures
Installation usually works on the first try, but two errors come up regularly:
- Host system is missing dependencies on Ubuntu/Debian: Playwright needs OS-level libraries like libgbm, libasound2, and libatk-bridge2.0. Run playwright install --with-deps instead of playwright install to have Playwright install these automatically.
- browserType.launch: Executable doesn't exist: This happens when the browser binary download was interrupted or skipped. Run playwright install again. If you are behind a corporate proxy, set the HTTPS_PROXY environment variable before running the command.
- WSL path issues on Windows: If you installed Python inside WSL but are running your editor in Windows, the paths will not match. Install Playwright inside WSL and run tests from the WSL terminal, not the Windows one.
The Playwright troubleshooting guide on GitHub covers additional edge cases for Docker, CI runners, and ARM architectures.
Saving dependencies
Lock your versions into a requirements file so your team and CI pipeline use the same setup:
pip freeze > requirements.txt
Anyone cloning the project can then run pip install -r requirements.txt followed by playwright install to match your environment exactly.
Writing your first end-to-end test
With the environment ready, you can write a real test that opens a browser, navigates to a page, and checks a visible element. This is the standard Playwright automation flow that every Python Playwright test follows.
The test file
Create a file named test_example.py inside your tests/ folder:
import refrom playwright.sync_api import Page, expect
def test_homepage_has_playwright_in_title(page: Page):
    page.goto("https://playwright.dev/")

    #Check that the page title contains "Playwright"
    expect(page).to_have_title(re.compile("Playwright"))
def test_get_started_link_navigates(page: Page):
    page.goto("https://playwright.dev/")

    #Click the "Get started" link
    page.get_by_role("link", name="Get started").click()

    #Verify the heading on the new page
    expect(page.get_by_role("heading", name="Installation")).to_be_visible()
Here is what happens in each test:
- page: Page is a fixture from the pytest-playwright plugin. It hands you a fresh, isolated browser page. You never need to create or close it manually.
- page.goto() navigates the browser to a URL. Playwright waits for the page to reach the load state before continuing.
- expect() is Playwright's web-first assertion method. It automatically retries until the condition is met or a timeout is reached (default 5 seconds).
- get_by_role() finds elements using their accessibility role, which is more stable than CSS selectors.
Running the test
Execute the test from your project root:
pytest tests/test_example.py -v
The -v flag gives you verbose output showing each test name and its pass/fail status. By default, tests run in headless mode (no visible browser window).
To see the browser in action:
pytest tests/test_example.py -v --headed
Running on different browsers
The plugin defaults to Chromium. You can switch browsers using the --browser flag:
pytest tests/test_example.py --browser firefox
pytest tests/test_example.py --browser webkit
To run on all three browsers in one go:
pytest tests/test_example.py --browser chromium --browser firefox --browser webkit
This triples your test count because each test runs once per browser. It is the simplest way to do cross-browser testing with Playwright Python.
Tip: Add default browser and mode settings to your pytest.ini file so you do not have to type flags every time: [pytest] addopts = --browser chromium --headed
Understanding pytest-playwright fixtures
The plugin provides several built-in fixtures. Here are the ones you will use most:
| Fixture | Scope | What it provides |
|---|---|---|
| page | function | A new Page in an isolated BrowserContext for each test |
| context | function | A new BrowserContext (useful for multi-tab scenarios) |
| browser | session | The shared Browser instance across all tests |
| browser_type | session | The BrowserType object (chromium, firefox, webkit) |
| browser_name | session | The browser name string |
The page fixture is function-scoped, meaning each test gets its own clean page with fresh cookies and storage. This isolation prevents test-to-test state leaks, which is one of the most common causes of flaky tests.
Working with locators, actions, and assertions
Locators are how you tell Playwright which element to interact with on the page. Choosing the right locator strategy directly impacts how stable your tests will be over time. Playwright recommends using locators that reflect how real users see the page.
Recommended locator methods
Playwright provides user-facing locator methods that mirror how people actually find things on a screen:
from playwright.sync_api import Page, expect
def test_locator_examples(page: Page):
    page.goto("https://demo.playwright.dev/todomvc/")

    #By role - finds elements by their ARIA role
    todo_input = page.get_by_role("textbox", name="What needs to be done?")
    expect(todo_input).to_be_visible()

    #By placeholder - matches input placeholder text
    expect(page.get_by_placeholder("What needs to be done?")).to_be_visible()

    #By text - finds elements containing specific text
    page.get_by_text("All").click()
    expect(page.get_by_text("All")).to_be_visible()
Each locator above is paired with an assertion or action. In real tests, a locator without an assertion is dead code, it finds the element but never verifies anything about it.
Performing actions
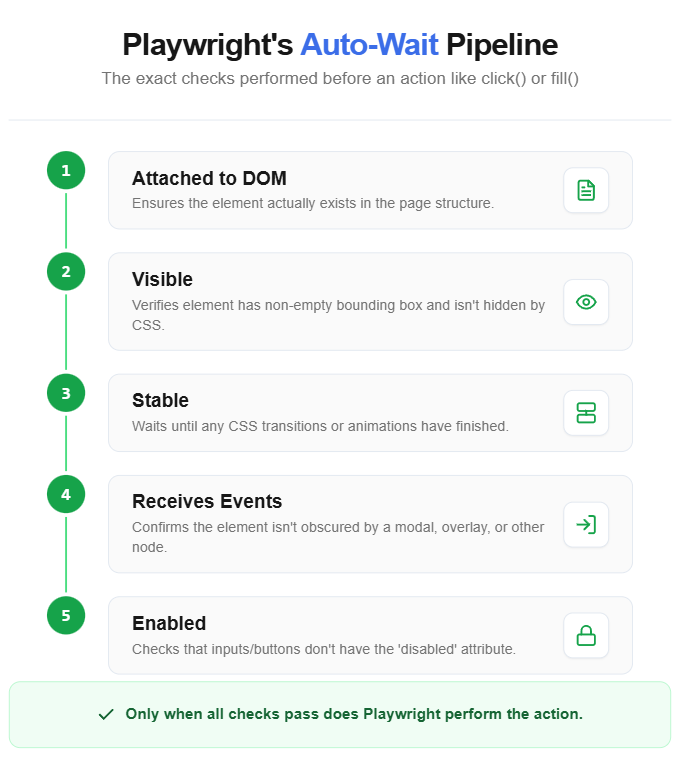
Once you have a locator, you can perform actions on it. Playwright auto-waits for the element to be visible, stable, and ready to receive input before executing.
from playwright.sync_api import Page, expect
def test_add_todo_item(page: Page):
    page.goto("https://demo.playwright.dev/todomvc/")

    #Type into the input field
    todo_input = page.get_by_placeholder("What needs to be done?")
    todo_input.fill("Write Playwright tests")
    todo_input.press("Enter")

    #Verify the item appeared in the list
    expect(page.get_by_test_id("todo-title")).to_have_text("Write Playwright tests")
Common actions you will use frequently:
- click() clicks an element
- fill() clears and types into a text field
- press() presses a keyboard key
- check() / uncheck() toggles checkboxes
- select_option() picks from a dropdown
- hover() moves the mouse over an element
Web-first assertions with expect()
Playwright's expect() function is different from Python's built-in assert. It retries automatically until the condition passes or the timeout expires.
from playwright.sync_api import Page, expect
def test_assertion_examples(page: Page):
    page.goto("https://demo.playwright.dev/todomvc/")

    #Page-level assertions
    expect(page).to_have_url("https://demo.playwright.dev/todomvc/")
    expect(page).to_have_title("React • TodoMVC")

    #Element visibility
    header = page.get_by_role("heading", name="todos")
    expect(header).to_be_visible()

    #Text content
    expect(header).to_have_text("todos")

    #Element count
    todo_items = page.get_by_test_id("todo-title")
    expect(todo_items).to_have_count(0)
Note: Never use time.sleep() in Playwright tests. The auto-waiting mechanism built into every action and expect() assertion replaces the need for manual delays entirely.
Handling common interaction patterns
Here are patterns you will encounter in almost every real-world project:
Working with forms:
from playwright.sync_api import Page, expect
def test_login_form(page: Page):
    page.goto("https://example.com/login")

    #Fill the form
    page.get_by_label("Email").fill("user@example.com")
    page.get_by_label("Password").fill("secure-password")

    #Submit the form
    page.get_by_role("button", name="Sign in").click()

    #Assert successful login
    expect(page).to_have_url("https://example.com/dashboard")
Working with dropdowns:
from playwright.sync_api import Page
def test_select_country(page: Page):
page.goto("https://example.com/settings")

    #Select by visible text
    page.get_by_label("Country").select_option(label="India")
Mocking network requests with route
Playwright can intercept and mock network requests directly inside your test. This is useful when you need to test error states, simulate slow APIs, or avoid hitting real backends during testing.
from playwright.sync_api import Page, expect
def test_mock_api_response(page: Page):

     #Intercept the API call and return a mock response
     page.route("**/api/users", lambda route: route.fulfill(
       status=200,
       content_type="application/json",
       body='{"users": [{"name": "Test User"}]}'
    ))
    page.goto("https://example.com/dashboard")
    expect(page.get_by_text("Test User")).to_be_visible()
You can also block specific resources to speed up tests:
from playwright.sync_api import Page
def test_block_images_for_speed(page: Page):

     #Block all image requests to speed up page load
     page.route("**/*.{png,jpg,jpeg,svg}", lambda route: route.abort())
     page.goto("https://example.com")
The route() API is one of Playwright's strongest advantages over Selenium, which has no built-in equivalent. For more complex mocking scenarios, refer to the Playwright network documentation.
Organizing tests with the page object model
As your test suite grows beyond a handful of files, repeating locators and interaction logic across tests becomes a maintenance problem. The page object model (POM) solves this by putting all page-specific selectors and actions into a single class.
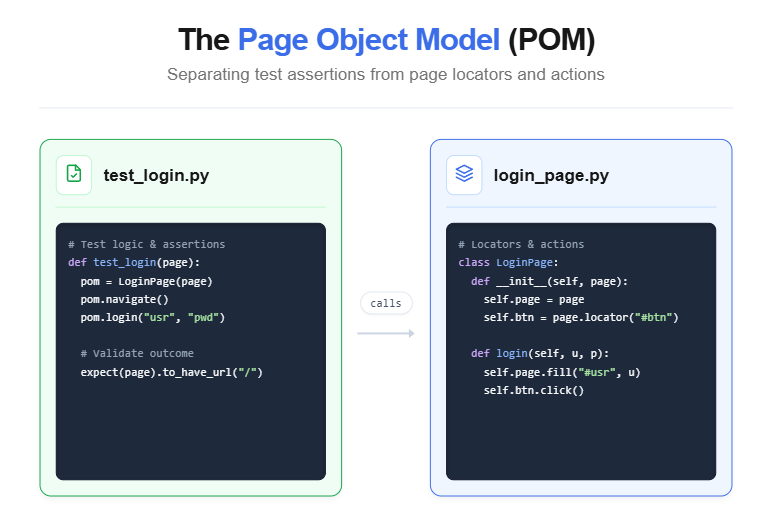
Creating a page object class
Let's create a page object for a login page:
from playwright.sync_api import Page, expect
class LoginPage:
def init(self, page: Page):
    self.page = page
    self.email_input = page.get_by_label("Email")
    self.password_input = page.get_by_label("Password")
    self.submit_button = page.get_by_role("button", name="Sign in")
    self.error_message = page.get_by_role("alert")
def goto(self):
    self.page.goto("https://example.com/login")
def login(self, email: str, password: str):
    self.email_input.fill(email)
    self.password_input.fill(password)
    self.submit_button.click()
def expect_error(self, message: str):
    expect(self.error_message).to_have_text(message)
Key things to notice:
- Locators are defined in init, so they are set up once
- Methods describe user actions in plain language (login, goto)
- The class accepts a page fixture through its constructor
Wiring page objects into conftest.py
Use pytest fixtures in conftest.py to inject page objects into your tests:
import pytest
from pages.login_page import LoginPage
@pytest.fixture
def login_page(page):
    """Provides an initialized LoginPage object."""
    return LoginPage(page)
Writing tests with page objects
Now tests become clean and readable:
from playwright.sync_api import Page, expect
def test_successful_login(login_page, page):
    login_page.goto()
    login_page.login("user@example.com", "password123")
    expect(page).to_have_url("https://example.com/dashboard")
def test_invalid_password_shows_error(login_page):
    login_page.goto()
    login_page.login("user@example.com", "wrong-password")
    login_page.expect_error("Invalid credentials")
If the login form's HTML changes, you update the LoginPage class once, and all tests that use it keep working.
Tip: Keep assertions out of page object methods when possible. Let the test file own the "what should happen" logic, and let the page object own the "how to interact" logic. The one exception is helper methods like expect_error that encapsulate a commonly repeated assertion.
Scaling with multiple page objects
For larger applications, create one page object per page or major UI component:
pages/
├── init.py
├── login_page.py
├── dashboard_page.py
├── settings_page.py
└── checkout_page.py
Each page object follows the same pattern. This approach reduces test maintenance significantly as your application evolves.
Running, debugging, and reporting test results
Once your tests are written, you need reliable ways to run them, debug failures, and view results. This section covers every option Playwright Python gives you.
Running tests with CLI options
The pytest-playwright plugin adds several flags to the standard pytest CLI:
pytest --slowmo 500

terminal - Run with tracing enabled
pytest --tracing on

terminal - Capture screenshots on failure
pytest --screenshot only-on-failure

terminal - Record video of every test
pytest --video on
Note: Traces, screenshots, and videos are saved to the test-results/ folder by default. Each test gets its own subfolder, making it easy to locate artifacts for failed runs.
Generating tests with codegen
Playwright includes a built-in code generator that records your browser actions and outputs Python test code. This is extremely useful for bootstrapping tests quickly.
playwright codegen https://demo.playwright.dev/todomvc/
This opens a browser window and an inspector panel. Every click, type, and navigation you perform gets recorded as Python code. Copy the generated code into your test file and refine it.
Debugging with the Playwright inspector
When a test fails, you need to see exactly what happened. Playwright provides two debugging approaches:
Using page.pause():
Add page.pause() anywhere in your test to freeze execution and open the Playwright Inspector:
from playwright.sync_api import Page
def test_debug_example(page: Page):
    page.goto("https://example.com")
    page.pause() # Opens the inspector here
    page.get_by_role("link", name="Login").click()
Using the PWDEBUG environment variable:
set PWDEBUG=1 && pytest tests/test_debug.py

terminal - macOS/Linux
PWDEBUG=1 pytest tests/test_debug.py
This launches every test in debug mode with the inspector open. You can step through actions one by one and see the DOM state at each step. These techniques align with standard Playwright debugging workflows.
Using the trace viewer
The trace viewer is Playwright's most powerful debugging tool. It captures a complete timeline of your test, including screenshots, DOM snapshots, console logs, and network requests.
Enable tracing in your pytest.ini:
[pytest]
addopts = --tracing retain-on-failure
After a test fails, open the trace:
playwright show-trace test-results/test-debug-example/trace.zip
The trace viewer opens in a browser, letting you scrub through every action like a video timeline.
Viewing test reports
For test reporting beyond terminal output, you can use pytest's built-in JUnit XML output:
pytest --junitxml=report.xml
This generates a standard JUnit XML file that CI platforms like GitHub Actions, Jenkins, and GitLab CI can parse and display. For teams that need richer reporting with historical trends and test failure analysis, dedicated test intelligence platforms like TestDino can ingest these results and surface patterns across runs.
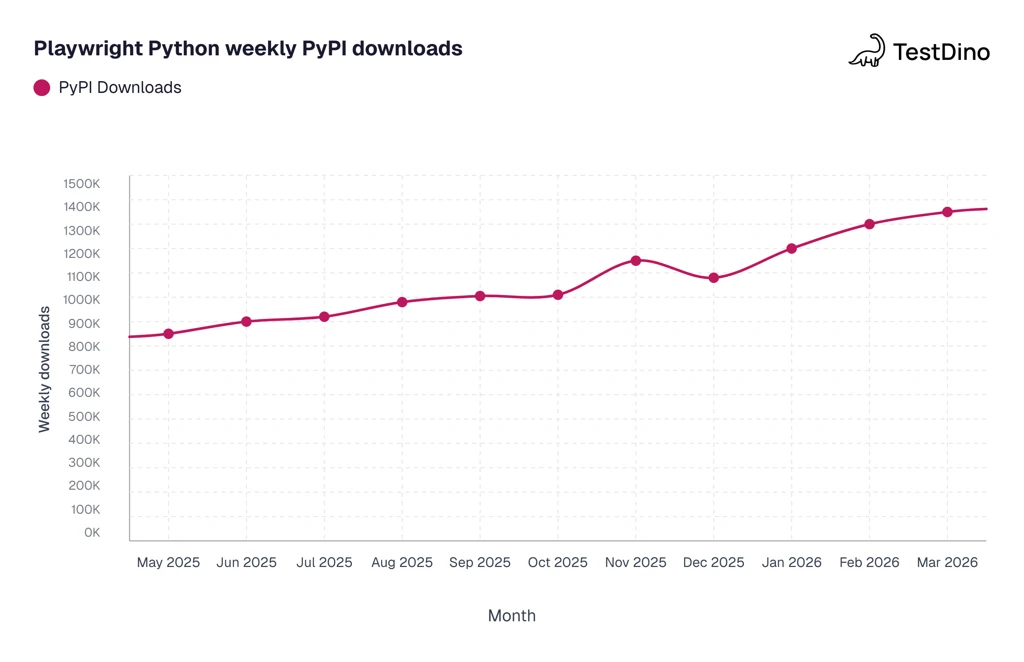
Source: PyPI download statistic
Best practices for scaling your Playwright Python test suite
Getting a few tests to pass is the easy part. Keeping 500 tests stable across browsers and CI environments is where real engineering matters. These practices come from teams that have scaled Playwright suites past the point where shortcuts start to break.
Use environment variables for configuration
Hard-coding URLs and credentials into tests makes them impossible to reuse across environments. Use environment variables or a conftest.py fixture instead:
import os
import pytest
@pytest.fixture(scope="session")
def base_url():
     return os.getenv("BASE_URL", "https://staging.example.com")
Run tests in parallel
Install pytest-xdist to run tests across multiple CPU cores:
pip install pytest-xdist
pytest -n auto
The -n auto flag detects your CPU count and distributes tests evenly. Since each Playwright test gets its own browser context, there are no shared-state conflicts. This is important for keeping CI/CD pipelines fast.
Set up CI with GitHub Actions
A minimal GitHub Actions workflow for running Playwright Python tests in CI looks like this:
name: Playwright Tests
    on: [push, pull_request]
    jobs:
         test:
        runs-on: ubuntu-latest
            steps:

            uses: actions/checkout@v4

            uses: actions/setup-python@v5
            with:
               python-version: '3.12'

name: Install dependencies
    run: |
        pip install -r requirements.txt
        playwright install --with-deps chromium

name: Run tests
    run: pytest --tracing retain-on-failure --junitxml=results.xml

name: Upload test artifacts
    if: always()
    uses: actions/upload-artifact@v4
        with:
          name: test-results
          path: test-results/
Tip: Use playwright install --with-deps in CI to automatically install both the browser binary and its OS-level dependencies (like libgbm on Ubuntu). This prevents the most common CI failures.
Avoid common mistakes
Based on patterns from real-world Playwright test failures, here are the mistakes to avoid:
- Do not use time.sleep() for waits. Use expect() assertions instead.
- Do not rely on CSS class names for locators. They change frequently. Use get_by_role() or get_by_test_id().
- Do not share state between tests. Each test should start from a clean context.
- Do not skip test isolation to save time. The 50ms overhead of creating a new context is negligible compared to the hours you lose debugging state leaks between tests.
Keep tests independent
Each test should work in isolation. If a test needs a logged-in user, set up authentication inside the test (or use a shared fixture with storageState), not by depending on another test to log in first:
import pytest
@pytest.fixture(scope="session")
def browser_context_args(browser_context_args):
    return {
        **browser_context_args,
        "storage_state": "auth_state.json"
   }
Generate the auth_state.json file once during setup by running a login flow and saving cookies. Every test then starts already authenticated without repeating the login steps.
Consider visual regression testing
For UI-heavy applications, functional tests alone may not catch layout shifts, font rendering issues, or CSS regressions. Playwright supports visual comparison out of the box with expect(page).to_have_screenshot(), which compares a current screenshot against a stored baseline.
from playwright.sync_api import Page, expect
def test_homepage_visual_regression(page: Page):
    page.goto("https://example.com")
    expect(page).to_have_screenshot("homepage.png", max_diff_pixels=100)
The first run generates the baseline image. Subsequent runs compare the live page against it and fail if the pixel difference exceeds your threshold. Store baseline images in version control so your team reviews visual changes alongside code changes.
Conclusion
This Python Playwright tutorial covered the complete journey from setting up a virtual environment to running end-to-end tests across Chromium, Firefox, and WebKit. You installed the pytest-playwright plugin, wrote tests using web-first assertions, structured your project with the page object model, and configured debugging tools like the trace viewer.
The core takeaway is that Playwright Python eliminates much of the friction that makes browser testing painful. Auto-waiting replaces manual sleeps. Context isolation removes test-to-test contamination. Built-in fixtures handle browser lifecycle so you can focus on writing actual test logic.
Where you go from here depends on your project:
- New to browser testing: Start with playwright codegen to record and learn the API through real interactions
- Migrating from Selenium: Replace WebDriver calls with Playwright equivalents one test file at a time. The locator model and assertion API map naturally
- Scaling an existing suite: Add parallel execution with pytest-xdist, enable tracing for CI failures, and adopt POM across your pages
- Production teams: Pair your test suite with a test intelligence platform to get historical trend data, flaky test detection, and failure root cause analysis that static reports cannot provide
Playwright Python is actively maintained by Microsoft with regular releases. The framework crossed 1.4 million weekly PyPI downloads in 2026, which means community support, plugin availability, and issue resolution are all strong. If you are building or expanding a Python browser testing strategy, this framework is a reliable foundation to build on.
FAQs
Table of content
Flaky tests killing your velocity?
TestDino auto-detects flakiness, categorizes root causes, tracks patterns over time.
Follow Us