Playwright vs Percy: Which Visual Testing Tool Fits Your Team?
Wondering whether to use Playwright's native screenshots or Percy's cloud platform for visual testing? This detailed comparison helps you decide.


Every front-end deployment carries a silent risk. Something looks different, and nobody notices until a customer screenshots the broken checkout page.
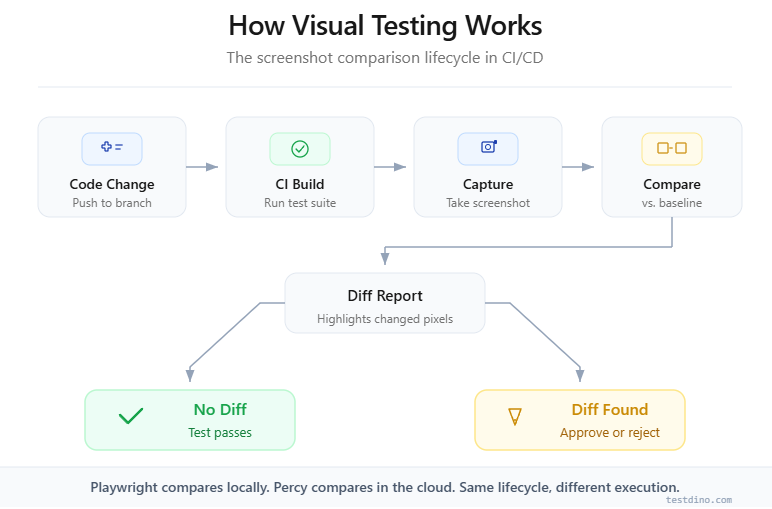
Visual regression testing catches those pixel-level shifts before they reach production. In 2026, two tools dominate this space: Playwright's built-in screenshot comparison and Percy's cloud platform.
The real pain is choosing between a free, repo-level approach and a paid platform promising smarter diffs and team-wide review. This guide puts Playwright's native visual testing side by side with Percy so you can make that call with confidence.
What is visual testing
Visual testing, also called visual regression testing, compares screenshots of your application's UI against approved baseline images. If a pixel-level difference exceeds a set threshold, the test fails and flags the change for review.
Visual testing validates that the rendered appearance of a UI matches its approved state. It catches CSS regressions, layout shifts, and styling errors that functional tests miss entirely.
Functional tests confirm that a button click triggers the right API call. Visual tests confirm that the button still renders in the right place, with the right color, at the right size.
According to the World Quality Report 2023-24 by Capgemini, 60% of organizations reported UI-related defects among the top three causes of production incidents. That is why visual testing tools have moved from "nice to have" to required in modern CI/CD.
Here is what visual testing catches that functional tests miss:
-
Layout shifts from CSS changes, font-loading delays, or responsive breakpoints
-
Color and typography regressions from design system updates
-
Component overlap caused by dynamic content lengths
-
Third-party widget changes like embedded maps, ads, or chat widgets
Note: Visual testing does not replace functional or accessibility testing. It adds a layer that specifically protects the rendered output of your UI.
The two dominant approaches in 2026 are Playwright's built-in screenshot testing and Percy's cloud-based visual regression platform. Let us break down each one.
Playwright visual testing: how it works
Playwright ships with a native visual comparison API since version 1.22. You call expect(page).toHaveScreenshot() inside any test, and Playwright handles capture, storage, and pixel-by-pixel diffing internally. Zero external dependencies.
The core API
The entire workflow revolves around one assertion:
import { test, expect } from '@playwright/test';

test('homepage visual check', async ({ page }) => {
  await page.goto('https://example.com');
  await expect(page).toHaveScreenshot('homepage.png');
});
On the first run, Playwright creates a baseline image in a __snapshots__ directory alongside your test file. On subsequent runs, it captures a fresh screenshot and compares it pixel by pixel against the baseline.
If the difference exceeds your configured threshold, the test fails.
How the diffing engine works
Playwright uses the pixelmatch library under the hood. It is a strict, pixel-level comparator that checks each pixel's RGB values. You control sensitivity through three options:
-
maxDiffPixels: Maximum number of pixels that can differ before the test fails
-
maxDiffPixelRatio: Maximum fraction of differing pixels (0 to 1)
-
threshold: Per-pixel color sensitivity from 0 (exact match) to 1 (any color)
await expect(page).toHaveScreenshot('homepage.png', {
  maxDiffPixelRatio: 0.01,
  threshold: 0.2,
});

Tip: Always generate baselines inside your CI environment (Docker container or GitHub Actions runner). Font rendering differences between macOS and Linux are the number one cause of false positives.
Baseline management
Baselines are plain PNG files stored in Git. This means:
-
Every baseline change shows up as a binary diff in your pull request
-
You update baselines by running npx playwright test --update-snapshots
-
There is no visual review dashboard; you review diffs through your Git client or CI artifacts
Strengths of Playwright's approach
-
Cost: Completely free and open source
-
Speed: No network round-trips; everything runs locally
-
Privacy: Screenshots never leave your infrastructure
-
Simplicity: One API call, zero configuration, no API tokens
Limitations to watch for
-
OS sensitivity: A baseline generated on macOS will fail on a Linux CI runner due to font anti-aliasing differences
-
No smart diffing: pixelmatch cannot distinguish a meaningful layout shift from a harmless sub-pixel change
-
Manual review: Reviewing screenshot diffs in Git is painful at scale (50+ visual tests)
-
Single-browser: Screenshots come from whatever browser your test uses, with no multi-browser rendering from one call
Understanding these trade-offs matters when scaling your test automation pipeline.
Percy visual testing: how it works
Percy, now owned by BrowserStack, takes a fundamentally different approach. Instead of comparing screenshots locally, it uploads DOM snapshots to its cloud, renders them across multiple browsers, and uses AI-powered diffing to highlight only meaningful changes.
The workflow
Percy does not capture screenshots on your machine. It serializes your page's DOM and CSS, uploads the snapshot to Percy's cloud, and renders it there. This eliminates the OS-level rendering inconsistency that plagues local approaches.
Here is how you use Percy alongside Playwright:
import { test } from '@playwright/test';
import percySnapshot from '@percy/playwright';

test('homepage Percy snapshot', async ({ page }) => {
  await page.goto('https://example.com');
  await percySnapshot(page, 'Homepage');
});
How Percy's diffing engine works
Percy's engine goes beyond pixel-level comparison. According to BrowserStack's documentation, it uses:
-
Anti-aliasing detection that ignores sub-pixel rendering differences across browsers
-
Layout stability analysis that separates intentional changes from noise
-
Smart thresholding that adjusts sensitivity based on the type of change detected
This means fewer flaky tests caused by irrelevant pixel noise, especially across browsers.
The review dashboard
Percy's biggest differentiator is its web-based review dashboard. When a visual test detects a change, any team member (including designers and product managers) can:
-
View baseline, new screenshot, and highlighted diff side by side
-
Approve or reject the change with a single click
-
Leave comments on specific regions of the screenshot
-
See approval status integrated into GitHub or GitLab pull requests
Note: Percy's review workflow is particularly valuable for teams where designers sign off on UI changes before merge. Asking designers to review Git diffs of PNG files is not realistic.
Pricing structure
Percy uses a screenshot-based billing model:
-
Free tier: 5,000 screenshots/month, unlimited users and projects
-
Paid plans: Scale based on monthly screenshot volume
-
Billing math: 1 snapshot at 3 widths across 2 browsers = 6 screenshots consumed
Tip: Track your screenshot consumption carefully. A suite with 100 visual checks at 3 widths across 2 browsers uses 600 screenshots per CI run. On daily pushes, the free tier runs out in under 9 days.
Strengths of Percy's approach
-
Smart diffing: AI-powered comparisons reduce false positives significantly
-
Cross-browser rendering: One snapshot call generates screenshots across Chromium, Firefox, and WebKit
-
Collaboration: Web-based dashboard with approval workflows
-
CI integration: Native PR status checks show visual diff results directly
Limitations to watch for
-
Cost at scale: Screenshot billing grows fast for large suites
-
External dependency: Screenshots are uploaded to Percy's cloud
-
Network latency: DOM upload adds time to each test run
-
Vendor lock-in: Migrating means rebuilding workflows and re-establishing baselines

Playwright vs Percy: head-to-head comparison
Now that you understand how each tool works, let us compare them across the dimensions that matter when making this percy vs playwright comparison for your team.
Feature comparison table
| Feature | Playwright (built-in) | Percy (by BrowserStack) |
|---|---|---|
| Cost | Free, open source | Free tier (5,000 screenshots/month), paid plans scale by volume |
| Setup complexity | Zero config, built into Playwright | Requires @percy/playwright SDK + API token + Percy project |
| Diffing engine | pixelmatch (pixel-level) | AI-powered (anti-aliasing aware, layout analysis) |
| Baseline storage | Git (PNG files in repo) | Percy cloud |
| Cross-browser rendering | Only the browser your test uses | Multi-browser from a single snapshot |
| Review workflow | Git diffs + CI artifacts | Web dashboard with approve/reject |
| False positive rate | Higher (OS-sensitive, no smart diffing) | Lower (AI-driven noise filtering) |
| CI integration | Native (part of test run) | PR status checks + dashboard link |
| Privacy | Screenshots stay in your infra | DOM snapshots uploaded to Percy cloud |
| Responsive testing | Manual (set viewport per test) | Automatic (configure widths in Percy settings) |
| Team collaboration | Limited to PR comments | Visual review dashboard with role-based access |
Accuracy and false positives
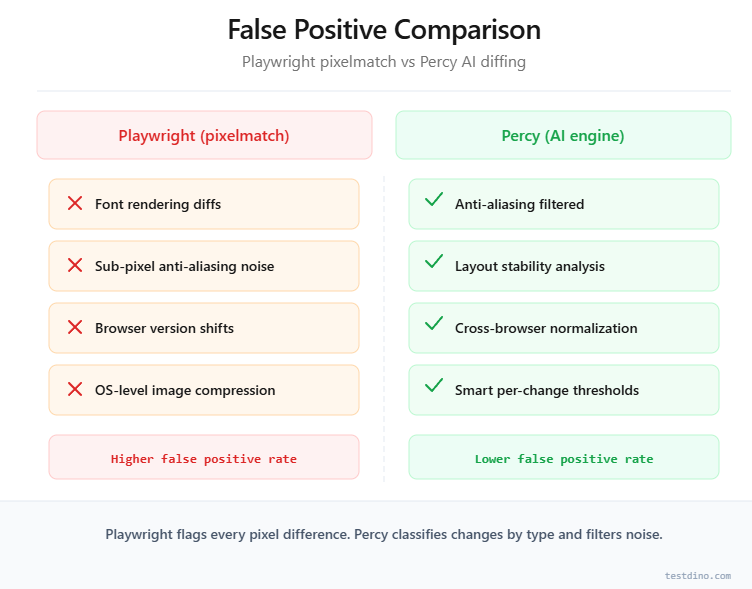
The single biggest complaint in visual testing is false positives. A test that fails because of a one-pixel font rendering difference wastes developer time and erodes trust in the test suite.
Playwright's pixelmatch engine treats every pixel equally. A sub-pixel anti-aliasing difference registers the same as a button that moved 20px to the left. You can tune maxDiffPixelRatio, but it is a blunt instrument. Too low means noise. Too high means missed regressions.
Percy's AI engine categorizes changes differently:
-
Anti-aliasing noise: Ignored automatically
-
Layout shifts: Flagged as significant
-
Content changes: Flagged as significant
-
Rendering engine differences: Suppressed in cross-browser comparisons
Teams running 100+ playwright visual tests typically find that this diffing intelligence directly reduces triage time. Understanding test failure analysis patterns helps quantify that cost.
Speed and CI performance
Playwright screenshot testing adds minimal overhead because capture and comparison happen locally. A typical toHaveScreenshot() assertion adds roughly 200-500ms to a test.
Percy introduces network overhead. DOM serialization, upload, and cloud rendering add 1-3 seconds per snapshot based on page size. That difference compounds at scale.
For a suite of 200 visual tests:
-
Playwright only: ~100 seconds of added screenshot time
-
Percy: ~400-600 seconds of added snapshot/upload time
This is not a dealbreaker, but it matters when optimizing e2e test performance benchmarks.
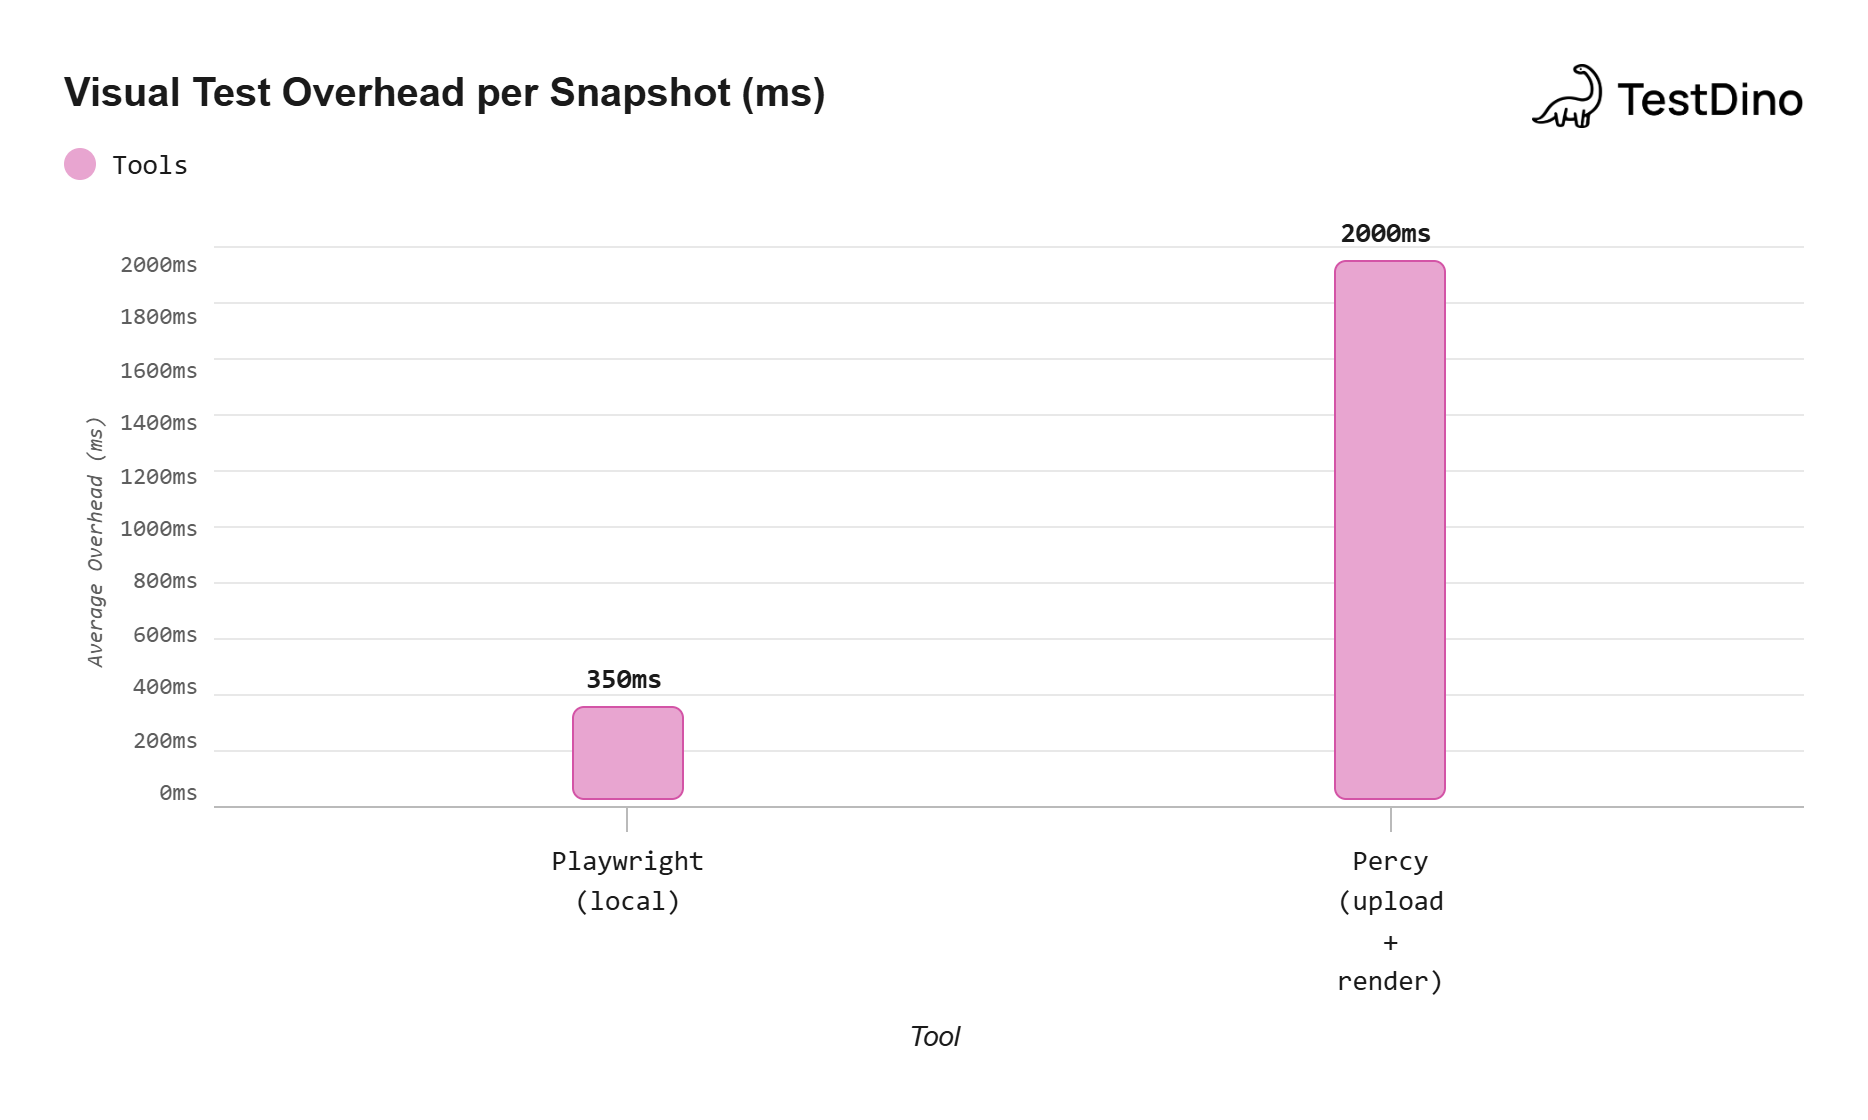
Source: Aggregated from Playwright GitHub discussions and Percy documentation (2025).
Note: Values are approximate averages from user-reported benchmarks.
Maintenance burden
With Playwright, you maintain baselines in Git. Every legitimate UI change requires --update-snapshots, committing new PNGs, and reviewing them in the PR.
This works for small suites but gets tedious when 30 baselines change after a design system update.
With Percy, baseline management is automatic. Approve a change in the dashboard and it becomes the new baseline. No Git commit, no binary file bloat.
In our experience working with QA teams, the baseline management wall hits around 80-100 visual tests. Before that, Git-based baselines are manageable. After it, the overhead hurts velocity.
This difference in test maintenance cost is often the tipping point for larger teams.
Setting up visual tests in Playwright (step by step)
Here is a complete playwright screenshot testing setup from scratch. This assumes you already have a Playwright framework setup in place.
Step 1: install Playwright (if not already installed)
npm init playwright@latest
Select TypeScript, install browsers, and confirm config generation.
Step 2: create your first visual test
Create a new test file in your tests/ directory:
import { test, expect } from '@playwright/test';

test('landing page visual snapshot', async ({ page }) => {
  await page.goto('https://your-app.com');

  // Wait for fonts and images to load
  await page.waitForLoadState('domcontentloaded');

  // Take a full-page screenshot and compare against baseline
  await expect(page).toHaveScreenshot('landing-page.png', {
    fullPage: true,
    maxDiffPixelRatio: 0.01,
    animations: 'disabled',
  });
});
Tip: Set animations: 'disabled' in your screenshot options. CSS animations captured mid-frame are the second most common source of false positives after font rendering differences.
Step 3: generate baselines
Run the test once to create the initial baseline:
npx playwright test tests/visual-regression.spec.ts --update-snapshots
This creates a __snapshots__ folder next to your test file containing the baseline PNG.
Step 4: configure for CI consistency
Add a Docker-based CI step to eliminate OS-level rendering differences. Here is a GitHub Actions example:
# Replace the Playwright version below with your installed version
name: Visual Regression Tests
on: [pull_request]

jobs:
  visual-tests:
    runs-on: ubuntu-latest
    container:
      image: mcr.microsoft.com/playwright:v1.52.0-noble
    steps:
      - uses: actions/checkout@v4
      - run: npm ci
      - run: npx playwright test --grep @visual
      - uses: actions/upload-artifact@v4
        if: failure()
        with:
          name: visual-test-results
          path: test-results/
Note: Use Playwright's official Docker image for CI runs. This ensures baselines and test screenshots render on the same OS, kernel, and font stack every time.
Step 5: handle dynamic content
Dynamic elements like timestamps, user avatars, or animated banners cause false positives. Mask them before taking the screenshot:
await expect(page).toHaveScreenshot('dashboard.png', {
  mask: [
    page.locator('.timestamp'),
    page.locator('.user-avatar'),
    page.locator('.animated-banner'),
  ],
  animations: 'disabled',
});
This is especially useful when debugging Playwright tests that fail intermittently due to changing content.
Troubleshooting: If baselines fail unexpectedly after a CI update, run npx playwright show-report locally to inspect the diff images. Most failures trace back to Docker image version changes or font package updates.
Setting up Percy with Playwright (step by step)
Percy visual regression testing requires a few more setup steps, but the process is straightforward.
Step 1: create a Percy account and project
- Sign up at percy.io
- Create a new project in your Percy dashboard
- Copy your PERCY_TOKEN from project settings
Step 2: install the Percy SDK
npm install --save-dev @percy/cli @percy/playwright
Step 3: set your Percy token
Add the token to your CI environment variables. Never commit it to your repo.
export PERCY_TOKEN=your_token_here
Security: Store your PERCY_TOKEN as a CI secret (GitHub Secrets, GitLab CI Variables). Never hardcode it in config files, even for internal projects. Leaked tokens expose your entire visual baseline history.
Step 4: write your first Percy test
import { test } from '@playwright/test';
import percySnapshot from '@percy/playwright';

test('checkout page visual check', async ({ page }) => {
  await page.goto('https://your-app.com/checkout');
  await page.waitForLoadState('domcontentloaded');

  // Percy captures the DOM and CSS, uploads to cloud for rendering
  await percySnapshot(page, 'Checkout Page');
});
Step 5: run tests with Percy
Percy wraps your Playwright test run:
npx percy exec -- npx playwright test tests/percy-visual.spec.ts
Percy CLI intercepts the percySnapshot calls, serializes the DOM, and uploads it. Visit your Percy dashboard after the run to review diffs.
Step 6: configure responsive widths
Set up multiple viewport widths in your .percy.yml configuration:
version: 2
snapshot:
  widths:
    - 375
    - 768
    - 1280
Each snapshot generates screenshots at all three widths across configured browsers. This is where Percy's screenshot billing multiplier kicks in.
Note: You can mix Playwright's built-in visual tests with Percy in the same project. Use toHaveScreenshot() for quick local checks and Percy for full cross-browser coverage.
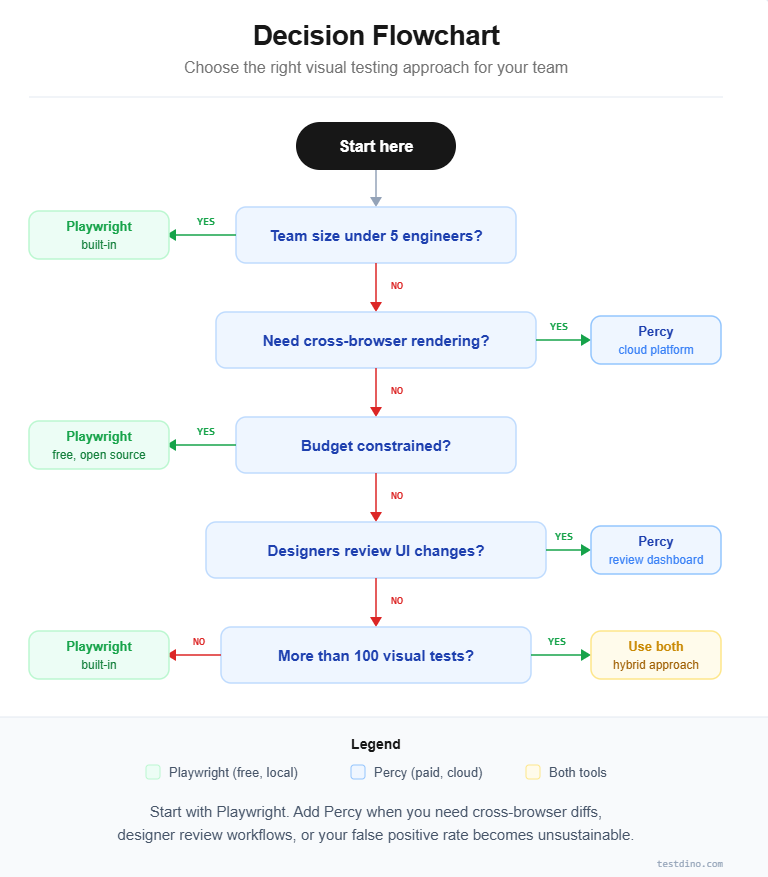
When to pick Playwright, Percy, or both
The right choice depends on team size, budget, visual test volume, and collaboration needs. Here is a decision framework based on real-world scenarios.
Choose Playwright's built-in visual testing when:
-
Your team is small (under 5 engineers) and can manage baselines manually
-
You run fewer than 50 visual tests in your suite
-
Budget is a constraint and you need a zero-cost solution
-
Data privacy rules prevent uploading screenshots to external services
-
You only need to test against a single browser engine
Choose Percy when:
-
Your team includes designers or product managers who review UI changes
-
You need cross-browser visual validation from a single test
-
Your visual test suite exceeds 100 snapshots and false positives waste developer time
-
You want automated responsive testing across multiple viewports
-
Your organization already uses BrowserStack and can bundle Percy into an existing contract
Use both together when:
-
You want fast local checks during development plus cross-browser validation before merge
-
Critical user flows get Percy coverage while less critical pages use Playwright
-
You are migrating from one tool to the other during a transition period
This hybrid approach is increasingly common in teams tracking test quality metrics closely. Playwright handles speed-sensitive local checks. Percy handles accuracy-sensitive cross-browser validation.
What about other tools?
Applitools, Chromatic, and BackstopJS are alternatives worth evaluating. Applitools offers AI diffing similar to Percy. Chromatic focuses on Storybook-based component testing. BackstopJS is an open-source option with Docker-based rendering.
Real-world cost comparison
Here is how the annual cost looks for a typical mid-size team:
| Scenario | Playwright (built-in) | Percy (paid plan) |
|---|---|---|
| 50 visual tests, single browser, 10 CI runs/day | $0/year | Free tier (5,000 screenshots covers it) |
| 200 visual tests, 3 browsers, 3 widths, 20 CI runs/day | $0/year | ~36,000 screenshots/day, well into paid tier |
| 500 visual tests, full cross-browser, continuous CI | $0/year | Enterprise pricing required |
The cost gap widens dramatically at scale. For teams managing large Playwright test suites, the decision often comes down to how much time your team spends on false positive triage.
Tools like TestDino help bridge this gap with real-time test reporting and AI-powered failure analysis. These reduce manual overhead whether you use Playwright, Percy, or both.
Conclusion
Playwright vs Percy is not a binary choice. It is a spectrum.
Playwright gives you free, fast, local visual testing that works out of the box. Percy gives you intelligent, cross-browser, team-friendly visual validation at a cost.
For small teams running fewer than 50 visual tests against a single browser, Playwright's toHaveScreenshot() API is the clear starting point. It costs nothing and keeps everything inside your repo.
For larger teams needing cross-browser rendering and a review dashboard, Percy fills a gap that Playwright's native tooling cannot. The cost is justified when the alternative is hours spent triaging false positives.
For teams wanting the best of both worlds, the hybrid approach is the most practical path. Pair either tool with a test intelligence platform for visibility into failure trends and overall suite health.
Start with Playwright's built-in visual testing. If and when you hit its limitations, evaluate Percy as your next step. You do not need to commit to one forever.
FAQs
Table of content
Flaky tests killing your velocity?
TestDino auto-detects flakiness, categorizes root causes, tracks patterns over time.
Follow Us