Playwright Authentication: 5 Patterns Every QA Must Know
Stop repeating login flows in every test. This guide covers five Playwright authentication patterns with production-ready code, from storageState reuse to OAuth and bearer token injection.


Most modern web apps hide their core features behind a login wall. If your end-to-end tests cannot get past that wall reliably, every test after it becomes useless.
The real pain is not writing the login code once. It is running it before every single test, watching your CI pipeline burn through minutes of repeated sign-in flows, and then debugging session failures that have nothing to do with the feature you actually wanted to test.
This guide walks through five playwright authentication patterns, from the simplest cookie-based reuse to full OAuth and bearer token injection, with working code you can drop into your Playwright test automation project today. It assumes you have Playwright installed and a basic test suite running.
What is playwright authentication and why does it matter
Playwright authentication is the process of signing into your application inside a test so that all subsequent actions run as a logged-in user. It uses browser context isolation and storage to save and restore cookies, localStorage, and session data across tests.
Without proper authentication handling, every test that touches a protected page would need to go through the login flow from scratch.
That repeated login creates two problems. First, it slows down your entire e2e testing suite because the browser has to render the login page, fill credentials, and wait for redirects every single time.
Second, it introduces a shared point of failure. If the login page changes even slightly, every test in your suite breaks at once.
Playwright solves this with a concept called storageState. According to the official Playwright documentation, Playwright executes tests in isolated environments called browser contexts. Tests can load existing authenticated state, which eliminates the need to authenticate in every test and speeds up execution.
The idea is simple:
-
Log in once in a setup step
-
Save the cookies, localStorage, and IndexedDB data to a JSON file
-
Load that file into every test that needs authentication

Tip: This "authenticate once, reuse everywhere" approach can cut total suite runtime by 40-60% on projects with 100+ tests. The difference between each pattern below is how and where you perform that initial login.
Before we get into the patterns, here is the folder structure Playwright recommends. Create a playwright/.auth directory and add it to your .gitignore right away.
Security Note: The auth state files contain sensitive session cookies that could be used to impersonate your test accounts. Never commit them to version control. Add playwright/.auth/ to your .gitignore immediately
mkdir -p playwright/.auth
echo "playwright/.auth" >> .gitignore
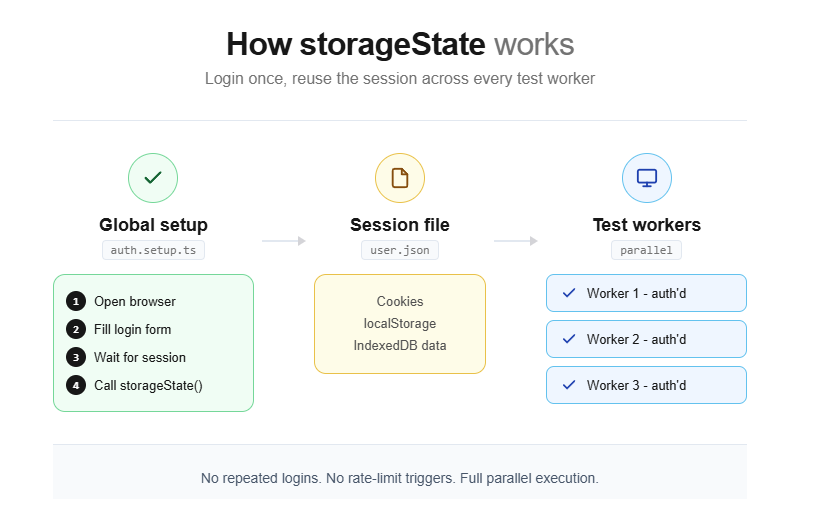
Pattern 1: storageState for reusable authenticated sessions
This is the most common playwright login automation pattern and the one Playwright officially recommends for most teams. You log in once inside a setup project, save the browser state, and every test after that starts already authenticated.
How it works
The storageState method serializes all cookies, localStorage entries, and IndexedDB data from the current browser context into a JSON file. Loading this file into a new context restores the exact session state without re-authenticating.
You create a dedicated setup file that performs the login through the browser UI, waits for the session to stabilize, and then calls page.context().storageState() to dump all cookies and local storage into a JSON file.
Your test config then tells every browser project to load that JSON before running any tests.
Here is the setup file:
import { test as setup, expect } from '@playwright/test';
import path from 'path';
const authFile = path.join(__dirname, '../playwright/.auth/user.json');
setup('authenticate', async ({ page }) => {
  await page.goto('https://your-app.com/login');
  await page.getByLabel('Username or email address').fill(process.env.TEST_USER_EMAIL!);
  await page.getByLabel('Password').fill(process.env.TEST_USER_PASSWORD!);
  await page.getByRole('button', { name: 'Sign in' }).click();
  // Wait for the final redirect to confirm cookies are set
  await page.waitForURL('https://your-app.com/dashboard');
  // Save the authenticated state
  await page.context().storageState({ path: authFile });
});
Now wire it into your Playwright configuration:
import { defineConfig, devices } from '@playwright/test';
export default defineConfig({
  projects: [
    // Setup project runs first
    {
      name: 'setup',
      testMatch: /.*\.setup\.ts/,
    },
    {
      name: 'chromium',
      use: {
        ...devices['Desktop Chrome'],
        storageState: 'playwright/.auth/user.json',
      },
      dependencies: ['setup'],
    },
    {
      name: 'firefox',
      use: {
        ...devices['Desktop Firefox'],
        storageState: 'playwright/.auth/user.json',
      },
      dependencies: ['setup'],
    },
  ],
});
Once this is configured, every test file automatically starts with a logged-in session. No extra code needed inside the test itself:
import { test, expect } from '@playwright/test';
test('dashboard loads user data', async ({ page }) => {
  // page is already authenticated
  await page.goto('https://your-app.com/dashboard');
  await expect(page.getByText('Welcome, testuser')).toBeVisible();
});
Why project dependencies beat globalSetup
Older guides often recommend using globalSetup for authentication. That approach works, but it has real drawbacks. The setup does not appear in your HTML report, you cannot attach traces or screenshots to it, and you cannot use Playwright fixtures inside it.
Project dependencies (available since Playwright v1.31) solve all three problems. The setup runs as a normal test, shows up in reports, and supports full debugging. If your authentication step fails in CI, you can see exactly what happened in the trace viewer instead of guessing from a generic error log.

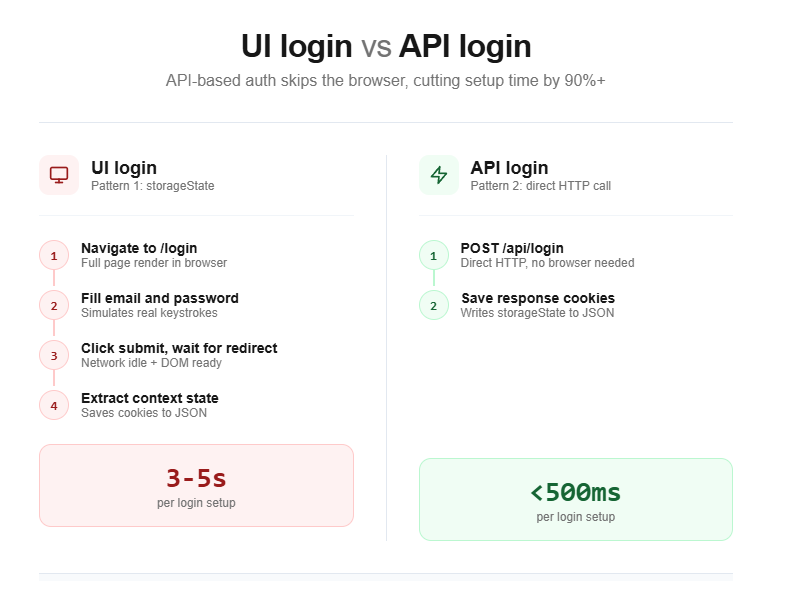
Pattern 2: API-based login for faster auth setup
The UI-based login from Pattern 1 works, but it is slow. The browser has to render the login page, execute any client-side JavaScript, and follow multiple redirects. If your app supports a login API endpoint, you can skip all of that.
Performance Tip: API-based login cuts authentication setup from 2-5 seconds (UI login) down to under 500 milliseconds. Across a suite of 200 tests running in CI, that difference translates to minutes saved per pipeline run.
This pattern uses Playwright's built-in APIRequestContext to send a direct HTTP request to your authentication endpoint. The response sets the session cookies, and you save them with storageState just like before.
import { test as setup } from '@playwright/test';
const authFile = 'playwright/.auth/user.json';
setup('authenticate via API', async ({ request }) => {
  // Send a direct POST to the login endpoint
  await request.post('https://your-app.com/api/auth/login', {
    data: {
      email: process.env.TEST_USER_EMAIL,
      password: process.env.TEST_USER_PASSWORD,
    },
  });
  // Save cookies and storage from the API response
  await request.storageState({ path: authFile });
});
Security Note: Never hardcode passwords in test files. Store credentials in a .env file locally and use your CI provider's secret management (GitHub Secrets, GitLab CI Variables, etc.) for pipeline runs.
When API auth makes sense
This approach is ideal when your backend exposes a REST or GraphQL login endpoint. It cuts the authentication step from 2 to 5 seconds (UI login) down to under 500 milliseconds. Across a suite of 200 tests running in CI, that difference adds up fast.
However, API-based auth skips the actual login UI entirely. If your login form has custom validation, CAPTCHA, or multi-step flows, you still need the UI-based approach from Pattern 1 for at least one dedicated login test. Use the API approach for everything else.
This is the same strategy recommended for Playwright API testing in general. You can mix UI and API calls in the same suite, using the API for setup and the browser for the actual feature tests.
Pattern 3: multi-role authentication testing
Real applications do not have just one type of user. You have admins, regular users, editors, viewers, and guest accounts. Each role sees different pages, buttons, and data.
This playwright authentication pattern extends the storageState approach to manage multiple sessions. Testing all roles means saving separate JSON files for each account.
Setting up multiple roles
The approach builds directly on Pattern 1. You create separate setup steps for each role and save their state to different JSON files:
import { test as setup, expect } from '@playwright/test';
const adminFile = 'playwright/.auth/admin.json';
const userFile = 'playwright/.auth/user.json';
setup('authenticate as admin', async ({ page }) => {
  await page.goto('https://your-app.com/login');
  await page.getByLabel('Email').fill(process.env.ADMIN_EMAIL!);
  await page.getByLabel('Password').fill(process.env.ADMIN_PASSWORD!);
  await page.getByRole('button', { name: 'Sign in' }).click();
  await page.waitForURL('**/admin/dashboard');
  await page.context().storageState({ path: adminFile });
});
setup('authenticate as user', async ({ page }) => {
  await page.goto('https://your-app.com/login');
  await page.getByLabel('Email').fill(process.env.USER_EMAIL!);
  await page.getByLabel('Password').fill(process.env.USER_PASSWORD!);
  await page.getByRole('button', { name: 'Sign in' }).click();
  await page.waitForURL('**/dashboard');
  await page.context().storageState({ path: userFile });
});
Using roles in your tests
Inside your test files, use test.use() to pick the role you need:
import { test, expect } from '@playwright/test';
test.use({ storageState: 'playwright/.auth/admin.json' });
test('admin can access user management', async ({ page }) => {
  await page.goto('https://your-app.com/admin/users');
  await expect(page.getByRole('heading', { name: 'User Management' })).toBeVisible();
});
import { test, expect } from '@playwright/test';
test.use({ storageState: 'playwright/.auth/user.json' });
test('regular user cannot see admin panel', async ({ page }) => {
  await page.goto('https://your-app.com/admin/users');
  await expect(page).toHaveURL('**/unauthorized');
});
Testing role interactions in a single test
A browser context in Playwright is an isolated session equivalent to an incognito window. Each context has its own cookies, localStorage, and cache. Opening multiple contexts in a single test lets you simulate multiple users interacting simultaneously.
Sometimes you need to verify how two roles interact. For example, an admin approves a request that a user submitted. Playwright lets you open multiple browser contexts in the same test, each with its own storageState:
import { test, expect } from '@playwright/test';
test('admin approves user request', async ({ browser }) => {
  // Create two isolated contexts with different roles
  const adminContext = await browser.newContext({
    storageState: 'playwright/.auth/admin.json',
  });
  const userContext = await browser.newContext({
    storageState: 'playwright/.auth/user.json',
  });
  const adminPage = await adminContext.newPage();
  const userPage = await userContext.newPage();
  // User submits a request
  await userPage.goto('https://your-app.com/requests/new');
  await userPage.getByLabel('Request title').fill('Need access to reports');
  await userPage.getByRole('button', { name: 'Submit' }).click();
  // Admin approves it
  await adminPage.goto('https://your-app.com/admin/requests');
  await adminPage.getByText('Need access to reports').click();
  await adminPage.getByRole('button', { name: 'Approve' }).click();
  // User sees the approval
  await userPage.reload();
  await expect(userPage.getByText('Approved')).toBeVisible();
  await adminContext.close();
  await userContext.close();
});
This multi-context approach is powerful for testing workflows that span roles, and it keeps everything within a single test so the flow reads like a story. You can further clean this up with page object models and custom Playwright fixtures for each role.
Pattern 4: bearer token injection for API-level auth
Not every test needs a browser. This playwright authentication pattern targets API endpoints that sit behind auth headers. You do not need to render a login page at all - just attach the right Authorization header to your requests.
This is a core concept in Playwright network mocking and API testing.
Playwright's APIRequestContext supports custom headers out of the box. You can fetch a token from your auth server and inject it into every subsequent API call.
Fetching and injecting a bearer token
import { test, expect } from '@playwright/test';
let token: string;
test.beforeAll(async ({ request }) => {
  // Get a token from the auth endpoint
  const response = await request.post('https://your-app.com/api/auth/token', {
    data: {
      client_id: process.env.CLIENT_ID,
      client_secret: process.env.CLIENT_SECRET,
      grant_type: 'client_credentials',
    },
  });
  const body = await response.json();
  token = body.access_token;
});
test('fetch user profile via API', async ({ request }) => {
  const response = await request.get('https://your-app.com/api/users/me', {
    headers: {
      Authorization: `Bearer ${token}`,
    },
  });
  expect(response.ok()).toBeTruthy();
  const user = await response.json();
  expect(user.email).toBeDefined();
});
test('create a new resource via API', async ({ request }) => {
  const response = await request.post('https://your-app.com/api/resources', {
    headers: {
      Authorization: `Bearer ${token}`,
    },
    data: {
      name: 'Test Resource',
      type: 'document',
    },
  });
  expect(response.status()).toBe(201);
});
Injecting tokens into browser-based tests
Sometimes your frontend reads a token from localStorage or a cookie and sends it as a header on every fetch call. You can inject this token directly into the browser context without going through the login flow:
import { test, expect } from '@playwright/test';
test('inject token into localStorage', async ({ page, request }) => {
  // Get token via API
  const response = await request.post('https://your-app.com/api/auth/token', {
    data: {
      email: process.env.TEST_USER_EMAIL,
      password: process.env.TEST_USER_PASSWORD,
    },
  });
  const { access_token } = await response.json();
  // Navigate to the app domain first (localStorage is domain-specific)
  await page.goto('https://your-app.com');
  // Inject the token into localStorage
  await page.evaluate((tkn) => {
    localStorage.setItem('auth_token', tkn);
  }, access_token);
  // Now navigate to a protected page
  await page.goto('https://your-app.com/dashboard');
  await expect(page.getByText('Welcome')).toBeVisible();
});
Tip: Token injection gives you full control over the token value. Use it to test edge cases like expired tokens, malformed JWTs, or tokens with specific role claims without needing separate test accounts for each scenario.
This pattern is especially useful for single-page applications that store JWTs in localStorage. It avoids the login UI entirely and is ideal for testing authorization edge cases that would be difficult to reproduce through normal login flows.
For teams running large suites of Playwright scripts that mix UI and API testing, this pattern keeps your auth layer thin and predictable.
Pattern 5: handling OAuth and SSO flows
OAuth and SSO are the hardest playwright authentication flows to automate. They involve redirects to third-party identity providers (Google, GitHub, Okta, Azure AD), consent screens, and callback URLs that your test environment may not fully control.
There are three strategies for handling this, ranked from most reliable to most fragile.
Strategy A: bypass the UI with a direct token exchange
If your identity provider supports a direct token endpoint (most OAuth 2.0 providers do), you can skip the browser-based flow entirely. You send a POST request to the token endpoint with client credentials or a resource-owner password grant, get back an access token, and inject it into your tests.
import { test as setup } from '@playwright/test';
const authFile = 'playwright/.auth/oauth-user.json';
setup('authenticate via OAuth token endpoint', async ({ request, page }) => {
  // Direct token request to the identity provider
  const tokenResponse = await request.post(
    'https://auth.provider.com/oauth/token',
    {
      form: {
        grant_type: 'password',
        client_id: process.env.OAUTH_CLIENT_ID!,
        client_secret: process.env.OAUTH_CLIENT_SECRET!,
        username: process.env.OAUTH_TEST_USER!,
        password: process.env.OAUTH_TEST_PASSWORD!,
        scope: 'openid profile email',
      },
    }
  );
  const { access_token } = await tokenResponse.json();
  // Set the token in localStorage or cookies as your app expects
  await page.goto('https://your-app.com');
  await page.evaluate((tkn) => {
    localStorage.setItem('id_token', tkn);
  }, access_token);
  await page.context().storageState({ path: authFile });
});
This is the fastest and most stable approach. It does not depend on the provider's UI, so it will not break when Google changes their login page layout.
Strategy B: automate the provider's login UI
If you cannot use a direct token exchange (your provider does not support resource-owner password grants, or you need to test the actual SSO redirect flow), you have to automate the provider's login page.
import { test as setup, expect } from '@playwright/test';
const authFile = 'playwright/.auth/sso-user.json';
setup('authenticate via SSO', async ({ page }) => {
  // Start the login flow on your app
  await page.goto('https://your-app.com/login');
  await page.getByRole('button', { name: 'Sign in with Google' }).click();
  // You are now on Google's login page
  await page.getByLabel('Email or phone').fill(process.env.GOOGLE_TEST_EMAIL!);
  await page.getByRole('button', { name: 'Next' }).click();
  await page.getByLabel('Enter your password').fill(process.env.GOOGLE_TEST_PASSWORD!);
  await page.getByRole('button', { name: 'Next' }).click();
  // Wait for redirect back to your app
  await page.waitForURL('https://your-app.com/dashboard');
  await page.context().storageState({ path: authFile });
});
This approach is fragile because you are automating a third-party UI that you do not control. Google, Microsoft, and other providers frequently update their login pages, which is a common source of test failures. If you go this route, keep the SSO setup isolated in a single file so you only need to fix it in one place when the provider's UI changes.
Strategy C: use a test-only auth route
Many teams add a special authentication endpoint to their staging or test environments that bypasses the identity provider entirely. This route accepts a user ID or email and returns a valid session without any OAuth dance.
import { test as setup } from '@playwright/test';
const authFile = 'playwright/.auth/user.json';
setup('authenticate via test route', async ({ request }) => {
  // Hit a test-only endpoint that creates a session
  await request.post('https://staging.your-app.com/api/test/auth', {
    data: {
      userId: 'test-user-123',
      role: 'admin',
    },
  });
  await request.storageState({ path: authFile });
});
This is the most reliable strategy for OAuth-heavy apps. It keeps your tests independent of any identity provider, and it lets you create sessions for any role or user on demand.
Security Note: If you create a test-only authentication bypass route, protect it aggressively. Gate it behind an environment variable check (e.g., if (process.env.NODE_ENV !== 'test') return 403) and never deploy it to production. A leaked bypass route is a critical security vulnerability.
Comparing all five playwright authentication patterns
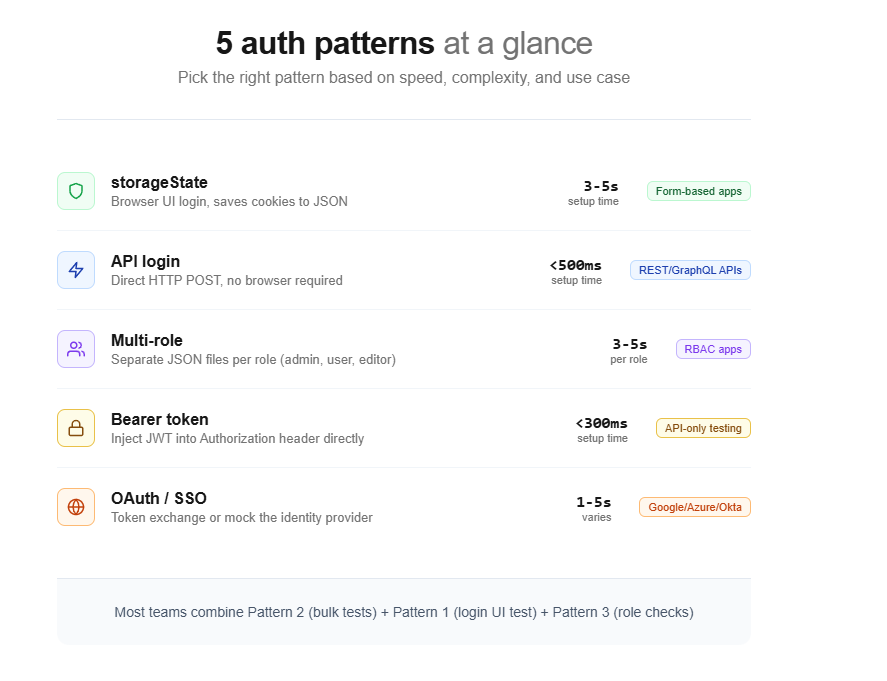
Choosing the right playwright authentication pattern depends on your app's auth system, your team's speed requirements, and how many user roles you need to test. Here is a side-by-side comparison:
| Pattern | Auth method | Speed | Best for | Limitation |
|---|---|---|---|---|
| storageState (Pattern 1) | Browser UI login | Medium (2-5s setup) | Standard form-based login apps | Slower than API auth |
| API login (Pattern 2) | HTTP POST to login endpoint | Fast (under 500ms) | Apps with REST/GraphQL auth APIs | Skips login UI testing |
| Multi-role (Pattern 3) | Multiple storageState files | Medium (scales with roles) | Apps with admin/user/editor roles | Requires separate test accounts |
| Bearer token (Pattern 4) | Direct header injection | Fast (under 300ms) | API-only testing, JWT-based apps | Does not verify cookie-based flows |
| OAuth/SSO (Pattern 5) | Token exchange or provider UI | Varies (depends on strategy) | Google/Azure/Okta SSO integrations | Most complex to maintain |
Most teams end up using a combination. Pattern 2 (API login) for the bulk of their tests, Pattern 1 (UI login) for a single dedicated login test, and Pattern 3 (multi-role) for permission-related scenarios.
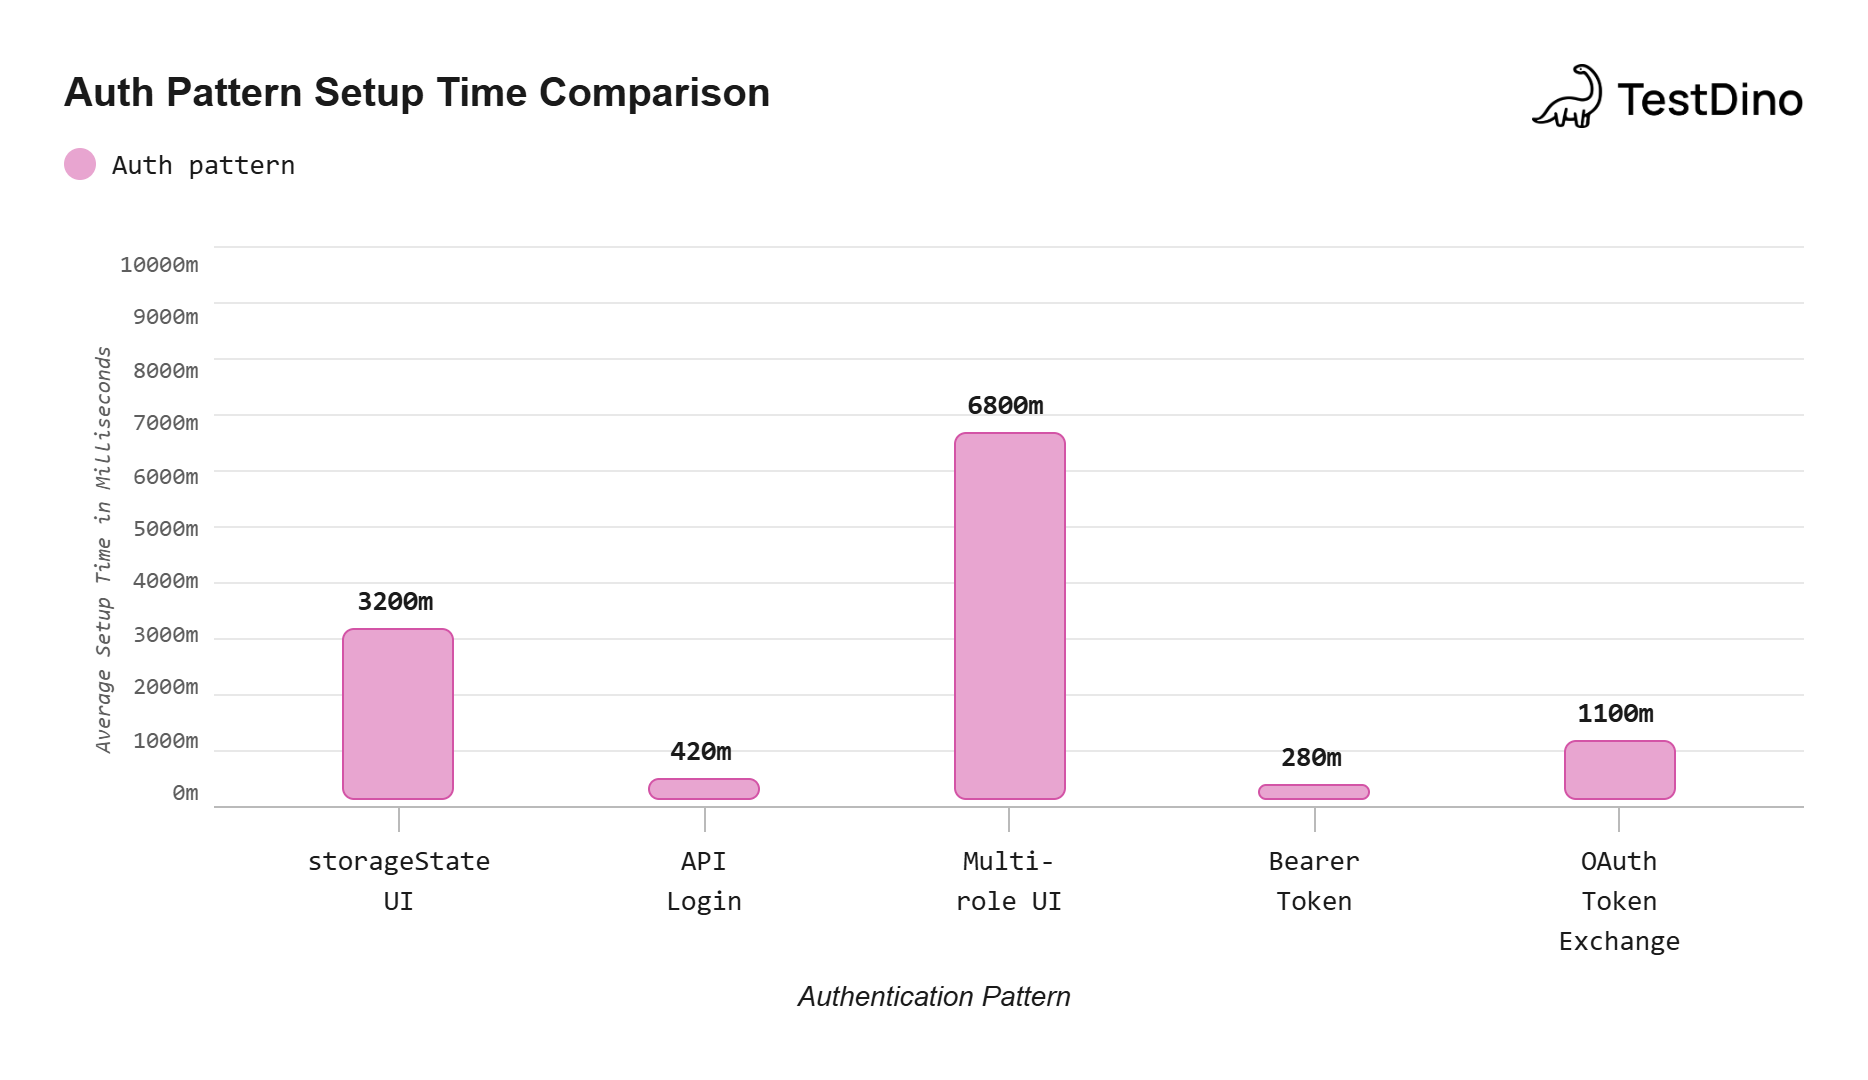
Source: Measured using Playwright v1.49 on a typical Node.js test environment with a local dev server. Values represent the average across 10 consecutive runs of each auth setup method.
Common playwright authentication mistakes and fixes
Even with the right pattern in place, there are several mistakes that can make your authenticated tests unreliable. These are the ones that show up most often in real projects.
Hardcoding credentials in test files
This is the most common mistake. Credentials committed to version control are a security risk and make it impossible to run the same tests against different environments without code changes.
Always use environment variables. Store them in a .env file locally and use your CI provider's secret management for pipelines. The Playwright configuration supports dotenv out of the box.
Not waiting for the redirect chain to finish
Login flows often involve multiple redirects. If you save storageState before all redirects complete, the cookies may be incomplete. Always use page.waitForURL() to wait for the final destination, or wait for a specific element on the post-login page.
Forgetting to add auth files to .gitignore
The storageState JSON file contains session cookies that can be used to impersonate your test account. If this file gets committed and pushed, anyone with access to the repo can hijack that session. Add playwright/.auth/ to your .gitignore immediately.
Using the same account for parallel workers
When tests run in parallel, each worker process gets its own browser context. If all workers use the same test account and your tests modify server-side state (like changing settings), they will interfere with each other and cause flaky tests.
The fix is to use one account per parallel worker, as described in the official Playwright docs. Use testInfo.parallelIndex to pick a unique account for each worker.
Tip: Use testInfo.parallelIndex in your auth setup to dynamically pick credentials. For example: const user = users[testInfo.parallelIndex]. This ensures each worker gets its own isolated account, eliminating cross-worker state interference.
Ignoring session expiration
Tokens and sessions expire. If your CI pipeline caches auth state files between runs and the session expires before the next run, all tests will fail at the first navigation. Either regenerate the auth state on every run (the default behavior with project dependencies) or handle token refresh in your setup.
Skipping unauthenticated test coverage
If every test in your suite runs with a logged-in session, you are not testing what happens when unauthenticated users visit protected pages. Playwright makes it easy to reset the storage state for specific test files:
import { test, expect } from '@playwright/test';
// Reset storage state to run without authentication
test.use({ storageState: { cookies: [], origins: [] } });
test('redirect to login when not authenticated', async ({ page }) => {
  await page.goto('https://your-app.com/dashboard');
  await expect(page).toHaveURL('**/login');
});
Teams that track their test failure patterns in a test reporting tool often find that auth-related failures account for a significant portion of their flaky tests. Getting the auth setup right is one of the highest-leverage improvements you can make to a test suite.
Conclusion
Playwright authentication does not have to be the weak point of your test suite. With storageState, you authenticate once and reuse that session across hundreds of tests. With API-based login, you cut setup time to under a second. With multi-role setups, you cover every permission level without duplicating login code.
The five patterns in this guide cover the full spectrum:
-
Pattern 1 (storageState) is the default choice for most projects
-
Pattern 2 (API login) speeds up setup by skipping the browser
-
Pattern 3 (multi-role) handles admin, user, and guest scenarios
-
Pattern 4 (bearer token) works for API-only testing and JWT apps
-
Pattern 5 (OAuth/SSO) tackles third-party identity providers
Start with Pattern 1 if you are new to Playwright authentication. Once your suite grows, layer in Pattern 2 for speed and Pattern 3 for role coverage. The key is to keep your auth logic in one place (the setup file) and let every test inherit it through the config. For a deeper dive into structuring your entire project, see the guide on reducing test maintenance in Playwright.
FAQs
Table of content
Flaky tests killing your velocity?
TestDino auto-detects flakiness, categorizes root causes, tracks patterns over time.
Follow Us